Refinished Bergere chair using Driftwood Weathering Wood Finish Before and After

Refinished thrift store chair using driftwood weathering wood finish

Refinished Thrift Store Chair Using
Driftwood Weathering Wood Finish Stain

Refinished Chair with Driftwood Weathering Wood Finish

Refinished Thrift Store Chair Turned Coastal Cottage Chic

I’m using an outdated and rather dark thrift store chair and updating it with a beachy driftwood finish fit for any vintage seaside cottage and I’m using  Driftwood Weathering Wood Finish.

This is my second refinished thrift store chair project and turning it into a beautiful piece of furniture to fit my beach cottage.  Like the first chair, this one was purchased for under $30 and it needs to be completely stripped of both its dark finish and outdated fabric. 

Once you find that special chair, here are the materials you will need:

To start, you will need to remove all the fabric.  This may entail removing screws and I had to take the chair apart in order to remove the seat.  Here is what you will need for each step:

Removing the Fabric

  • needle nose pliers for helping to remove staples – and there will be MANY, MANY staples. 
  • flat head screw driver – helps with removing staples
  • patience, patience, patience – removing the many staples is the most tedious part

Stripping the Finish

  • Furniture stripping agent such as Klean Strip Paint & Varnish Remover or other safe stripper
  • steel wool #0000
  • scrapper
  • sandpaper #150, #220 and #320
  • mineral spirits

Refinishing and Re-upholstering

  • Driftwood Weathering Wood Finish
  • Fabric of your choice
  • Piping (optional)
  • Chip brush
  • Drop cloth
  • Spray on glue for foam Elmer’s Craft Bond Spray Adhesive Multi-Purpose
  • Tacky glue (but only if using piping) Beacon Fabri-Tac Permanent Adhesive
  • good quality staple gun
  • staples

Refinished Bergere chair using Driftwood Weathering Wood Finish Before and After

Above is the original thrift store chair

It’s in good condition, but not suitable for a vintage seaside cottage.  I wanted that weathered look that I keep seeing in Ballard Designs and Restoration Hardware.  I am always inspired by the pages of Ballard Designs and they have a Bergere style chair with a weathered finish that sells for $800 or more.  Same with Restoration Hardware.  I know I can recreate the weathered finish with Driftwood Weathering Wood Finish stain AND I can find a fabric that will suit my decor perfectly.

Refinished Bergere chair using Driftwood Weathering Wood Finish Before and After

A key to re-upholstering the chair is to keep all the original fabric pieces, including any padding or backing.  This way you can use them as pattern pieces.  Make sure to mark each piece and even take pictures during the removal process that you can refer back to. 

Refinished Bergere chair using Driftwood Weathering Wood Finish Before and After

Take pictures and mark the pieces.  Once all the fabric has been removed, you can start stripping the finish.

Refinished Bergere chair using Driftwood Weathering Wood Finish Before and After

Refinished Bergere chair using Driftwood Weathering Wood Finish Before and After


I used an environmentally safe spray-on furniture stripper so as not to have hazardous chemicals seep into the ground water.  This particular stripper took longer and more elbow grease but I’m good with that. There are plenty of environmentally safe paint removers available.  To help remove the finish, I used #0000 steel wool especially in the hard to get areas.

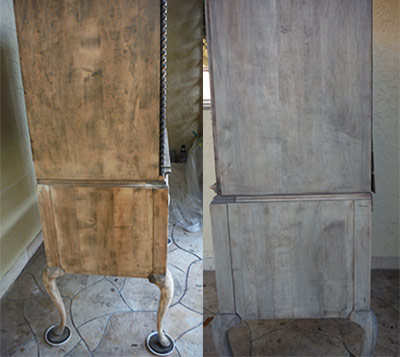
Fully Stripped of Finish and Fabric

The chair completely stripped, sanded and cleaned with mineral spirits.  Any chemical residue from the stripper or original finish will hinder the results of the Driftwood Weathering Wood Finish.  So I need to test the results using the Driftwood Weathering Wood Finish stain. 

Refinished Bergere chair using Driftwood Weathering Wood Finish Before and After

My first chair project turned out darker than I expected because I did not test the results first.  This time, I knew I wanted a lighter and more brown toned finish that would pick up the taupey brown tones in my chosen fabric. I also wasn’t at all sure what type of wood the chair was made from.  Since the more tannins a wood has – the darker the color will be when using the Driftwood Weathering Wood Finish.  It’s really important to test the results in an inconspicuous area first.

Refinished Bergere chair using Driftwood Weathering Wood Finish Before and After

As it turned out, diluting the Driftwood Weathering Wood Finish solution gave me the color I was looking for.  Instead of mixing 1 packet with 1 cup of water – I mixed it with 2 cups of water. 

Refinished Bergere chair using Driftwood Weathering Wood Finish Before and After

Here I am testing the finish against my chosen fabric which is Magnolia Home Indoor/Outdoor Sea Island Spa.  It has a beachy, cottage feel and even looks a bit vintage to me.  The colors are perfect! 

I seriously considered using the Driftwood Liming Wax to give it a lighter finish as I did with my first chair project but then realized I wanted a more driftwood, weathered finish.  A finish that was completely matte like a found piece of driftwood. 

Re-upholstering the Chair

I’ve been sewing since I was 10, but if you are not confident in your sewing skills, this might be where you want to take the chair and original fabric pieces to an upholstery shop to complete the project. 

Cut out all your fabric pieces using the original pieces as templates, which hopefully you saved and marked.  Same with any backing pieces. Sometimes you may need to replace the cushioning or backing pieces.

One thing I learned along the way was to use a spray glue good for closed cell foam such as Elmer’s Craft Bond Spray Adhesive Multi-Purpose to lightly glue ONLY the fabric backing to the foam.  DO NOT glue the actual fabric to the foam – just the backing materials.  This really helps keep everything in place while you are re-covering the chair.

Refinished Bergere chair using Driftwood Weathering Wood Finish Before and After

Another great tip is to fold and press your fabric under about 1/4″ before applying to the chair using a staple gun.  This way, you end up with a nice clean edge instead of frayed fabric edges.  Much less messy.  I also used piping to cover up any exposed staples and Beacon Fabri-Tac Permanent Adhesive to apply the piping.

Refinished Bergere chair using Driftwood Weathering Wood Finish Before and After

Refinished Bergere chair using Driftwood Weathering Wood Finish Before and After

Refinished Bergere chair using Driftwood Weathering Wood Finish Before and After

Final Project

Refinished Bergere chair using Driftwood Weathering Wood Finish Before and After


Total Cost for Refinishing and Re-Upholstering Thrift Store Bergere-Style Chair Using Driftwood Weathering Wood Finish

The total cost for this project was about is about $115.00 and that included:

  •  $25.00 for thrift store chair
  • $24 for a 3 yards of fabric
  • $12.99 for the Driftwood Weathering Wood Finish
  • $10.00 piping
  • $13.00 Elmer’s Craft Bond Spray Adhesive Multi-Purpose
  • $6.00 Beacon Fabri-Tac Permanent Adhesive
  • $12.99 environmentally safe paint and varnish stripper
  • $8.00 for incidentals such as staples and sandpaper

Refinished Bergere chair using Driftwood Weathering Wood Finish Before and After

Refinished Bergere chair using Driftwood Weathering Wood Finish Before and After

Stunning Driftwood Weathered Wood Finished Table and Chairs

Table & Chair Project Using Driftwood Products and Poets Paint Waterglass Paint

This is a project I’ve been working on for a year and a half, little by little, here and there until it’s finally now done.  Well, not really – I still have two more chairs that need to be stripped and finished but all I have room for right now is two chairs so I’m good – for now, I’ve got my driftwood weathered wood finished table and chairs.

Driftwood Weathering Wood Finish

I not only used the Driftwood line of products on this project, including the Driftwood Weathering Wood Finish, Driftwood Weathering Wax and Driftwood Liming Wax, but I also borrowed from our sister company, Poet’s Paint Waterglass Paint and painted the caning in Vintage White.  I also used one of my favorite colors, Poet’s Paint Vintage Silk Blue, which is a beautiful soft pale blue, and painted a drop cloth and used that for the chair covers.

Below, I’ve stripped and sanded this little table, then applied the Driftwood Weathering Wood Finish and finally applied the Driftwood Liming Wax.

Driftwood Weathering Wood Finish

Driftwood Weathering Wood Finish

Driftwood Weathering Wood Finish

I had my driftwood weathered wood finished table so next I started on the chairs.  I have four of them that I found at a second hand store and had to have them.  The carving is just exquisite but they are all heavily painted and need to be stripped.  I tried stripping them myself by it was soon clear it was way too laborious and tedious and I needed to call in the professionals.  I had two stripped professionally and the other two are still waiting to be done.

I still have no idea what type of wood they are made from and suspect that it is a composite.  You can see there is a variation in color in the two legs on the stripped chair and that caused a variation in color when I applied the Driftwood Weathering Wood Finish.

Driftwood Weathering Wood Finish

Driftwood Weathering Wood Finish

Driftwood Weathering Wood Finish

Now I used the Driftwood Weathering Wax and waxing brush to get more gray tone and even out the color.  After the Driftwood Weathering Wax, I went over by brushing it lightly with the Driftwood Liming Wax.  I have found that I like the combination of the Driftwood Weathering Wood Finish with the Driftwood Liming Wax on most of my pieces and usually do both.

Driftwood Weathering Wood Finish

Driftwood Weathering Wood Finish

Driftwood Weathering Wood Finish

Now comes the chair cover.  For this I used a drop cloth and Poet’s Paint Waterglass Paint in Vintage Silk Blue.  I filled a plastic storage container with about 3 gallons of water and to that I added about 1/2 quart of the paint and then just soaked the two pieces of cloth that I had already cut out for about an hour.  After an hour, I took the material out of the solution, rinsed it off and hung it to dry.  I later soaked it again in a bath of water softner as I found the canvas cloth to be rather stiff – due more to the weight of the canvas cloth and not the paint.  The softner bath helped a little so I could wrap it and staple it.

Once dry, I steamed them with a hot iron and wrapped and stapled them to make my chair covers.  The color was perfect.

Driftwood Weathering Wood Finish

Driftwood Weathering Wood Finish

My chairs and table are complete and look fantastic on my sun porch.

Driftwood Weathering Wood Finish

Creating a Driftwood Finish

If you’re anything like me, you love the look of driftwood furniture. The aged and worn look just appeals to me although most of the pieces I see for sale in the major stores are not actual driftwood but wood that’s made to look weathered, usually with painting techniques.  So I began a quest to find out how I could get that same look at home.  After all, I was experienced at refinishing furniture, painting, staining and distressing – why not try my hand at this driftwood finish look.

And there’s nothing more satisfying than finding a beautiful piece of furniture in a thrift store that someone else has discarded – no longer useful to them.  I’m one of those that can see its possibilities and I’m quick to snap it up, take it home and give it a whole new life.

I found myself a gem of a side table at one local thrift store.  It was perfect.  I stripped off the old stain and finish and had initially decided that I wanted a distressed white look.  After about four months of this distressed white table, I decided I wanted it to look more like a driftwood finish.  I was seeing driftwood tables, beds and lamps, etc. everywhere and I wanted it.

An indepth search on the Internet revealed some very interesting processes that others were using to achieve that driftwood finish.  Some with paint (which I also did and it came out great and you can read that post – Creating a Driftwood Finish With Paint), others with concoctions of vinegar and steel wood and still others using baking soda, tea and coffee.

Along the way, I discovered my own mixture, which I call Driftwood Weathering Wood Finish, and to my surprise, it worked beautifully on that little white table once I had stripped and sanded it again.  But I still wanted to test the other methods I came across so below you will see a video of the five different methods I used on 3 different types of wood – oak, pine and birch.  I will show the initial application and the outcome 24 hours later.

The five methods I use to achieve a weathered wood driftwood finish are:

#1 – Tea – Steeped green tea in 1/2 water for several hours.

#2 – Coffee – Steeped coffee grounds in 1/2 cup water for several hours.

#3 – Vinegar & Steel Wool (3 Cups White Vinegar and 1 steel wool pad – soaked for 45 days, although you really only need to soak it for 24 hours – I just happen to still have a mixture still around from another project);

#4 – Baking Soda & Water (1/4 Cup water to 1/8 Cup baking soda); and

#5 – Driftwood Weathering Wood Finish – which you can now buy here on our website or through Amazon

Watch Video

Driftwood Highboy Refinishing Project

Over the past 2 months, I’ve been slowly working on my driftwood highboy refinishing project which meant stripping and refinishing an antique highboy piece and then refinishing it with the Driftwood Weathering Wood Finish.  Well, I’m happy to say it’s finally done and I couldn’t be happier with the results.

driftwood highway
Finished Highboy using Driftwood Weathered Wood Finish

I purchased this highboy piece over 30 years ago at an antique store.  At the time I purchased the highboy, it was a hideous orange toned stained wood but it was a bargain at $375.00.  I distinctly remember that once I had stripped the orange stain, I had made a mental note that the bare wood had a beautiful distressed look to it and even back then I was tempted to leave it that way.  I also remember that I had done a major faux pas at the time I stripped it by using a steel wool pad to remove the finish and it had left little black specks everywhere.  But this had actually contributed to the weathered look in a good way.  I ended up staining the highboy in a dark mahogany color to match the other furniture in my room at the time.  I also remember that the stain did not take very well and I literally had to apply the stain and leave it on the piece without wiping off the excess.  This was the only way I could get the stain dark enough over the maple wood.

Original antique highboy
Original piece

Above is the piece before stripping and sanding.  It has always been a beautiful piece.  Below, I have started to strip and sand and needed to remove some of the more intricate pieces in order to get the finished removed.  I did this work outside in the Florida summer heat – not exactly the best conditions to be doing this type of work and that is why it took me 6 weeks to fully complete this project.  Some days it was just too hot!
Driftwood Highboy

Driftwood Finish Highboy


Driftwood Weathered Wood Finish applied to top drawer but still drying
Antique driftwood highboy
Stripped and sanded; application of Driftwood Weathered Wood Finish.

The original hardware was brass and my original intention was to create a “rusted” finish.  I thought driftwood finish would be a nice backdrop to rusted hardware.  I attempted many solutions to create a rusted finish including soaking the hardware overnight in baths of vinegar and baking soda; vinegar and salt; and ammonia.  While I didn’t get a rust finish, I did get a somewhat verdigris finish.  After soaking the hardware pieces overnight and letting them air dry, I then applied a product by Modern Options called Verdigris with a paintbrush and dried it using my heat gun.  This seemed to increase the verdigris finish somewhat although I did not use the product according to their directions.  I did not apply their base product.  I have since found that the hardware’s verdigris finish has continued to turn quite a bit.

distressed hardward
Distressing the hardware
finished driftwood highboy
Finished driftwood highboy

 Driftwood highboy

So there you have the final driftwood highboy refinishing project.  It came out even better than I had expected and I’m in love with this piece but now my bed no longer matches.  Just when I thought I was done with refinishing projects for awhile…

Driftwood Mid-Century Modern Nightstand Project

Project – Using Driftwood Weathering Wood Finish on Mid-Century Modern Nightstand

Driftwood Mid-century modern dresser

I found this beautiful nightstand at Goodwill for $25.00. I knew right away that it was a good, quality piece of furniture and sure enough, a little online research and “Dixie” furniture company was well known for mid-century furniture pieces. So, my problem is I want a mid-centuryDriftwood projects modern piece with the look of driftwood.  I’ve recently become infatuated with mid-century accessories and furniture – especially atomic art represented by the starburst.

This is my experiment to see if I can successfully combine the two with an updated, driftwood mid-century modern piece.

One of the things I found so special about this little nightstand was the handles – they had little “starburst” like symbols engraved in the metal. I had never seen that before but I thought that was pretty cool.

So my thought in this project is to use a starburst pattern and apply it using a mixture of wood glue and water like you would a stencil. Here is how the project went:

Driftwood Mid-Century dresser

Original piece being investigated by my little helper.

handles

These are the handles with the little “starbursts”

stripping the stain

Stripping the stain

Sanding the finish

Sanding the finish and then removing all the dust with tack cloth.

Sanded

All stripped and sanded and ready for the next step – adding the graphic.


Adding the stencil

Adding the graphics.  I used carbon paper and traced the image onto the nightstand.  Then carved around the image with an exacto blade.  The idea behind this was that the Driftwood Weathering Wood Finish would get in the cuts and create a darker outline of the image.

applying the graphic

Once I had the image on the nightstand with the carbon paper – I then used a mixture of Elmer’s glue and water (half n’ half) and went over the graphic using an artist’s brush.  The glue mixture should prevent the stain from adhering and it will give me the graphic on the nightstand.  There are wood glues out there that are specifically made to stain and others that should not take stain.  Another idea might be to use an artist masking fluid.  I suspect that would work just fine and it would give you a lighter graphic.  You should be able to remove the masking fluid and reveal the unfinished wood coming through your pattern.  I wish I had tried masking fluid first but patience is not one of my virtues and I wanted to get started with what I had.  I’ll try it with the next project.

Applying the Driftwood Weathered Wood Finish

I’ve applied the Driftwood Weathering Wood Finish.  One thing I noticed once I stripped the piece was that there were different types of wood used to make this piece.  The legs were a blond oak and the sides I believe were a maple but I’m not 100% positive about that.  The top piece is veneered – so I knew once I applied the Driftwood Finish, the different types of wood would each take the color differently.

Driftwood Weathered Wood Finish on Mid-Century Modern dresser

As you can see, the final piece has a lot of different tones – the legs are much lighter.  But I love how the graphic came out.  Now I have the problem of putting a protective finish on it.  My first thought was to put a coat or two of the Driftwood Beeswax Wood Butter but I quickly nixed that idea.  I realized that putting the wax over the cuts in the pattern would leave bits of wax in the cuts – like you get when someone does a poor job of waxing your car.  Thankfully, I realized this before I went ahead with putting on the beeswax.  But it does need some type of protective finish.

I’ve decided to put a matte polyurethane coating on the top at least.  I’ve applied the polyurethane to the top and sides and it really darkens the finish quite a bit – more than I think I want.  So I’m hesitating about putting the polyurethane on the front over the graphic – I’m afraid I’ll lose the graphic.  I may decide to use the Driftwood Liming Wax on the whole piece.  I suspect that I will lose the graphic if I do but I may be brave and do it anyway.  I will post pics if I do.

I think I have at least achieved my driftwood mid-century modern look that I was going after.

Follow-up – I decided to sand the polyurethane off and apply the beeswax wood butter instead to the sides and top.  The beeswax wood butter actually made the sides and top just as dark as the polyurethane so my only alternative is to leave it as is with a darker top and sides than I want or move on to trying the liming wax.  I decided to go with the liming wax and I’m happy with that.  It lightened up the top and sides a bit.  In the picture below, I have not applied to the Driftwood Liming Wax to the top yet – just to the side.

Liming wax applied to side