Make a Driftwood Ball

Make a Driftwood Ball

How to Make a Driftwood Ball

Very simple tutorial to Make a Driftwood Ball or Driftwood Orb.

Make a Driftwood Ball

 Materials Needed:

Pro Hot glue gun or Titebond HiPur Adhesive Applicator Glue sticks – professional glue such as:

  • Titebond Wood to Wood WW60 or WW30 (for use with Titebond HiPur Adhesive Applicator)
  • Ad-Tech Wood Glue Sticks
  • All Temperature Wood Stik
  • 100 or more 2″-6″ driftwood pieces.  
  • Balloon or beachball.  (Use extra strong balloons)

How to Make a Driftwood BallI wanted my driftwood ball to be about 10-12″ in diameter so I had to use a balloon.  I found “Punch Ball” balloons at Walmart for about $3.00 for a package of 8 which were strong enough and allowed me to get the size I wanted.  Once a blew up the balloon to the size I wanted, I tied it off so that I would be able to untie it easily enough to let the air out slowly when I was done instead of just popping the balloon.  My driftwood ball is about 10″ in diameter and I used 100 pieces of driftwood for my project.

How to Make a Driftwood Ball

How to Make a Driftwood BallI started by actually gluing a driftwood piece directly to the balloon just to hold it in place.  Keep in mind that once you let the air out of the balloon, it will continue to stick to the glue so you want to use as little glue as possible to hold it in place on the balloon and as few times as possible gluing directly to the balloon.  I believe I glued directly to the balloon 5 times.  The less you can do it the better.  Ideally, you want to glue just on the driftwood pieces.

And it’s important to use a professional hot glue gun and professional grade glue sticks or the piece will not stay together.  If you don’t want to use a glue gun, you can use any glue that will give you a quick and permanent adhesion – “quick” being the operative word here.  You don’t want to be holding the pieces in place and waiting for them to dry.

If you live in a hot, humid climate like Florida, you will find that regular glue sticks will not hold up and your driftwood orb will quickly fall apart so it is important to use professional glue for “all temperature”.  This will also allow you to use your driftwood ball outside without it disintergrating.

How to Make a Driftwood Ball

How to Make a Driftwood Ball Continue making your way around the balloon and filling in the spaces with driftwood pieces until you like what you see.

How to Make a Driftwood Ball
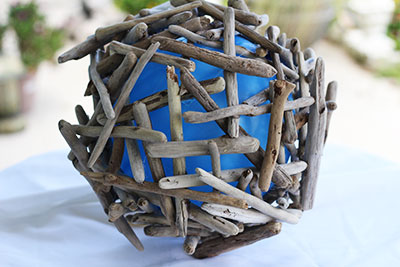
Find where you tied your balloon and untie it then slowly let the air out.  It should pull away from the glued sides but it will leave behind some pieces of balloon that will be difficult to remove unless you used as little as possible to hold it in place.

How to Make a Driftwood BallThere you have it – a beautiful driftwood ball that you made in about 2 hours.

Once you’ve created your driftwood ball, the possibilities are endless as far as what you can do with it. Certainly, it’s decorative and quite textural by itself but add a string of LED lights or even just one bulb and you’ve got a unique light source.  Attach dirt wrapped in moss using wire or fishing line and insert some succulent  plants and you’ve now got a unique planter.  Or just use it as a sculptural garden element.  Whatever you decide, you now have a clever and decorative driftwood element.


Make a Whimsical Driftwood Birdhouse

Make a Whimsical Driftwood Birdhouse

How to Make a Whimsical Driftwood Birdhouse

Make a Whimsical Driftwood Birdhouse

Simple tutorial will show you how to make a whimsical driftwood birdhouse for indoor or outdoor use.  Add charm and character to your garden with a whimsical driftwood birdhouse you make yourself.

Supplies

  • Driftwood pieces – 5-12″ round and flat plus assortment of other pieces. If you need driftwood pieces, we have driftwood in stock. 2-6″ pieces or 5-12″ pieces.
  • 18 oz. oatmeal carton or similar cardboard carton
  • Titebond WW30 or WW60 (for use with HiPur Adhesive Applicator) or Ad-Tech Wood Glue Sticks or All Temperature Wood Stik (look for glue sticks that will hold up in all temperatures)
  • Heat Gun such as HiPur Adhesive Applicator by Stienel or Professional Glue Gun
  • wooden stand (optional)
  • wooden round 5″ – 8″ (optional)

Make a Whimsical Driftwood Birdhouse


Make a Whimsical Driftwood Birdhouse

I used an 18 oz. oatmeal box but pretty much any similar cardboard box, round or square, will work.  Remove the advertising so you just have the brown cardboard.

Make a Whimsical Driftwood Birdhouse

Cut out a hole for the door and any additional “windows” you might want.

Make a Whimsical Driftwood Birdhouse

Then just fit and glue your pieces around your form.  You can use flat or round, long or short – just cover your form.

Make a Whimsical Driftwood Birdhouse


Make a Whimsical Driftwood Birdhouse

Once the form is covered on the sides, you can start on the top.  I wanted mine to be off-centered and longer on one side which would give it a more whimsical look so you can see I started with a long piece on one side propped up by a shorter piece on the other.  From there I just started filling in areas.  It’s like a puzzle where you find the best pieces to fit and pieces that will add some character here and there.

Make a Whimsical Driftwood Birdhouse

Here is a view from the back.  Once again, I just started layering smaller, flatter pieces on the roof until I had it completely covered.

Make a Whimsical Driftwood Birdhouse

In the front top I added a post that protruded out so the birds would have a perch and other little unique pieces that just fit well on the top.  I then added a “front porch” so to speak and a piece on the right that ended up looking almost like a handle.  I found a unique driftwood piece that was like a curly little pig’s tail and added that coming down from the top and one more piece to balance the left side and I was finished with my whimsical little birdhouse.  It was hard not to keep going by adding more little pieces here and there. 

Make a Whimsical Driftwood Birdhouse

The final thing I did was use the Driftwood Weathering Wood Finish on the base so it would look more weathered.  You can see the difference in the very top picture where it blends in very well with the regular driftwood.

And there you have it.  So cute in a garden or just on display.  Since I used Titebond WW30 HiPur Hot Melt Adhesive, I can use my birdhouse outside. 

Make a Whimsical Driftwood Birdhouse


Ideas for Landscaping with Driftwood

Landscaping with Driftwood Archway

Landscaping with Driftwood

Landscaping with driftwood starts with a good plan and a some imagination. Since driftwood is already a work of nature, it’s not difficult to cohesively work it in somewhere as either a focal point or complimentary element with your existing natural environment.

Driftwood can easily be carved, sanded and finished to get the shape, texture and look you’re after or just leave it as is. Whether using smaller-sized pieces for projects like birdhouses or larger pieces to make sculptures or lawn and garden furniture, you’re guaranteed to end up with items that are completely unique since no two pieces of driftwood will ever be alike in shape, texture and color.

For instance, if you want to give visual height to an area, create planters from a combination of driftwood and airplants, orchids, succulents or bromeliads then attach them to a wall or tree and watch your new plants happily make themselves at home in the cracks and crevices of the driftwood. Your wall will soon be teaming with carefree greenery, shoots and flowers and become a focal point.  The same idea can be used to create a horizontal focal point.

driftwood fencingLandscaping with driftwood can add visual interest and a focal point to areas that are frequently overlooked or otherwise seem to lack purpose and have no existing appeal. Imagine a large piece of driftwood where others might plant a tree or embed a large boulder – then surround your new sculpture with sea grass or wild flowers.

Think about adding a large driftwood pieces to a pond or other water feature you may have for a natural look. Driftwood on its own could make a unique and beautiful water fountain with the right tools and a little imagination.

Bind together long pieces of driftwood and attach a box to the top for a one-of-a-kind mailbox or create a driftwood Landscaping with Driftwood Benchchandelier for outdoor hanging in a special garden nook. Use it with candles or drape it with pretty flowers or vines.

How about creating driftwood retaining walls for flower beds or around trees by using 8″ linear pieces and sinking them into the ground. You can also create a heavier retainer wall with larger driftwood logs set end to end.

Thick, solid pieces of driftwood make wonderful benches or quaint chairs for sitting in unexpected places. Add a handcrafted driftwood table and you have yourself the perfect place to read a book and enjoy your garden while sipping an ice tea. Insert logs into the ground for natural fence posting.

There are a myriad of possibilities for landscaping with driftwood to create interest in your outdoor space. How will landscaping with driftwood inspire you?

Creating a Driftwood Finish

If you’re anything like me, you love the look of driftwood furniture. The aged and worn look just appeals to me although most of the pieces I see for sale in the major stores are not actual driftwood but wood that’s made to look weathered, usually with painting techniques.  So I began a quest to find out how I could get that same look at home.  After all, I was experienced at refinishing furniture, painting, staining and distressing – why not try my hand at this driftwood finish look.

And there’s nothing more satisfying than finding a beautiful piece of furniture in a thrift store that someone else has discarded – no longer useful to them.  I’m one of those that can see its possibilities and I’m quick to snap it up, take it home and give it a whole new life.

I found myself a gem of a side table at one local thrift store.  It was perfect.  I stripped off the old stain and finish and had initially decided that I wanted a distressed white look.  After about four months of this distressed white table, I decided I wanted it to look more like a driftwood finish.  I was seeing driftwood tables, beds and lamps, etc. everywhere and I wanted it.

An indepth search on the Internet revealed some very interesting processes that others were using to achieve that driftwood finish.  Some with paint (which I also did and it came out great and you can read that post – Creating a Driftwood Finish With Paint), others with concoctions of vinegar and steel wood and still others using baking soda, tea and coffee.

Along the way, I discovered my own mixture, which I call Driftwood Weathering Wood Finish, and to my surprise, it worked beautifully on that little white table once I had stripped and sanded it again.  But I still wanted to test the other methods I came across so below you will see a video of the five different methods I used on 3 different types of wood – oak, pine and birch.  I will show the initial application and the outcome 24 hours later.

The five methods I use to achieve a weathered wood driftwood finish are:

#1 – Tea – Steeped green tea in 1/2 water for several hours.

#2 – Coffee – Steeped coffee grounds in 1/2 cup water for several hours.

#3 – Vinegar & Steel Wool (3 Cups White Vinegar and 1 steel wool pad – soaked for 45 days, although you really only need to soak it for 24 hours – I just happen to still have a mixture still around from another project);

#4 – Baking Soda & Water (1/4 Cup water to 1/8 Cup baking soda); and

#5 – Driftwood Weathering Wood Finish – which you can now buy here on our website or through Amazon

Watch Video

How to Clean Driftwood

You’ve been lucky enough to find a unique piece of driftwood that you want to use for a project but now how do you clean it?  The forces of nature may have already removed much of the debris and hopefully,  left you a nicely weathered and smooth finish to start with but you still need to be able to remove the dirt, mold, parasites and other critters that may be lingering in your driftwood.

If you’re using your driftwood for an aquarium, you will need to use a natural process to clean driftwood without any chemicals.  If your pieces are small enough, you can boil them but you may split and crack the wood.  A better way to clean driftwood, and one that you can use regardless of whether you use the driftwood in an aquarium or not, is the slow soaking method using distilled water.Clean driftwood

Clean Driftwood Using the Distilled Water Soaking Method

Scrub your wood with a sturdy scrub brush to remove loose debris and surface dirt.  Fill a large container with enough distilled water to cover your wood.  I suppose one could use a bathtub if you don’t have a large container but I’m not sure what may be left behind in your tub once the process is finished.  

The driftwood needs to soak, fully covered, in the distilled water for at least two weeks, and you will need to change the water several times when it becomes dark with the leached tannins.  The tannin is what gives the wood its color and we want to get rid of as much color as possible in this process, along with any other critters.  You can place a large rock or something heavy to hold down your driftwood while it soaks.

After two weeks, remove the wood and place it somewhere where it will be able to dry undisturbed in an environment with low humidity.

Once it is dry, you can use it for whatever driftwood project you wish.

Clean Driftwood Using the Disinfecting Method 

Mix a solution of one part bleach to nine parts water and fill a large container so that there is enough solution to completely submerge your driftwood.  Place your driftwood in the solution.  Soak your driftwood for 3 or 4 days, changing out the disinfecting solution each day.  

Remove your driftwood and let it dry undisturbed in an environment with low humidity.  

You should not use clean driftwood that has been chemically bleached in an aquarium with live plants or animals.

Also see Refinish Driftwood

How to Create a Driftwood Candleholder

Three Simple Driftwood Candleholders You Can Make Yourself

Driftwood Candleholder Style #1Driftwood Candleholder

You will need:

  • enough cleaned driftwood pieces to fit around your glass candle container
  • multi-purpose epoxy glue
  • glass contained candle
  • raffia or twine (optional)

Directions:

For this style driftwood candleholder, you will want to have enough clean driftwood pieces to go around your glass container candle – 10-20 pieces to chose from depending on the size of your glass container . It’s best to use 1″ thick linear pieces rather than awkward shaped driftwood pieces.

Determine how tall you want the height to be. Some prefer the height to be just to the top of the glass while I’ve seen others extend it 2-3

inches taller than your glass container. Either way looks great.

  1. Saw off the ends of each piece so they will line up evenly at the bottom around the your glass container while still giving you the height you want.
  2. Now one by one, line up a piece with the bottom of the glass container and begin gluing. Continue until you have completed the circumference.

Wait until the glue dries according to the package before using.

You may wish to dress up your container with raffia or twine.

A great decorating tip is to create three of these candleholders of various heights for use in displaying.


Driftwood Candleholder Style #2Driftwood candleholder

You will need:

  • Driftwood
  • candles in glass votive holders or tea lights in tin holders
  • drill
  • 1  3/4″ (44 mm)  hole saw – which is a type of bit that will fit on a drill and create the holes (available at Lowe’s and Home Depot)

Directions:

Suppose you have a wonderfully unique piece that is too big to use for the first style candle holder but you really want a driftwood candleholder. If you have a piece that will sit solidly on a flat surface without being “tippy”, then this is a good option for making your unique driftwood candle holder.

  1. Lay your driftwood piece on a flat surface and determine where you might want to put one or more candles. Space them out so they won’t cause a fire hazard when lit.
  2. Once you have identified where you want the candles, mark the center.
  3. Now secure your driftwood and drill your holes using the hole saw drill bit to match the size of your votive or tin candle holders. Drill no more than 1/2″ for tin tea lights. You can drill deeper for votive holders. You want to make sure that the hole is not so deep that a lit candle will catch the surrounding edges of the driftwood on fire.

I’ve seen this style used with elaborate pieces and many candles, as well as with one hole and one simple candle – and they are all beautiful.

Driftwood Candleholder Style #3Driftwood candleholder

You will need:

  • thick cut of driftwood (4″ or more circumference)
  • drill
  • 1  3/4″ (44 mm)  hole saw – which is a type of bit that will fit on a drill and create the holes (available at Lowe’s and Home Depot)
  • glass votive holder or tea light tins

Directions:

  1. Cut both ends of your driftwood so both the top and bottom are flat.
  2. Using the hole saw drill bit, drill a hole in the center of the top deep enough to fit your tin or votive holder.
  3. Insert your votive or tin.

This style looks best when the votive or tin sits almost level with the driftwood surface.

A great tip is to make three of this style in various heights for a great display.

There you have it – a driftwood candle holder style for everyone!

Other projects to try: Driftwood Lamp; Driftwood Sailboat; Driftwood Christmas Tree, Driftwood Windchime, Driftwood Clock

How to Make a Driftwood Windchime

How to make a driftwood windchime using driftwood pieces and inexpensive silverware,  sea glass and marbles.  Here’s two different easy driftwood windchime versions – both make delicate chime sounds in the wind and either take just a few hours to make.  You can get creative and use seashells or other items that might inspire you.

 Driftwood Windchime

Here’s what you will need:

  • driftwood pieces (4-5). 
  • silverware (4-6 pieces – use soft pieces for easy flattening)
  • 14# fishing line
  • 24# beading wire
  • ear hoops from the beading department
  • flat drain from Wal-mart
  • sea glass pieces (available at Wal-mart)
  • Aleene’s Jewel It glue to glue fishing line knots
  • drill and drill bit for silverware
  • regular and needle nose pliers to mold wire around sea glass and bend fork
  • scissors
  • saw for driftwood pieces
  • hammer to hammer all the silverware pieces until flattened

Driftwood windchime

driftwood windchime

1. First use a hammer to flatten all the silverware pieces.

2. Drill a small hole at the top of each piece in order to pass the fishing line through.

3.  On one fork piece, using the pliers, twist each prong in each direction and curl under the end to form a small loop as shown in the picture below.  You will use each loop to string fishing line from the fork to loops on the strainer.

driftwood windchimedriftwood windchime

driftwood windchime

4.  Add an ear hoop to the underside of the strainer and using the fishing line, attach your choice of silverware as the centerpiece to your windchime.  I like to use a large silver spoon only because it tends to “hit” more of the other pieces moreso than a narrow knife or fork.

driftwood windchime

5.  Add 4 more ear loops to each opposing sides of the strainer.  These will be for the driftwood pieces.

6.  Add 4 more ear loops in between the existing ones.  These will be for the sea glass pieces.

7.  Now add 4 more ear loops in a circle half way between the outside rim and the center. These will be for the additional silverware pieces.  Add as many loops as you have silverware pieces.  You should now have 12 loops in additional to the center loop.

driftwood windchime

8.  Now cut your driftwood pieces to the lengths that you want.

9.  Drill holes in one end of each piece.  Insert a length of fishing line and tie off.  Just estimate a length of fishing line as you don’t want to put it together quite yet.

driftwood windchime

driftwood windchime

10.  Using the images above, wrap the wire around the sea glass pieces to hold it in place and form and loops and shapes shown.  These will hang easily onto the ear hoops.  You just want to make sure the sea glass is wrapped securely.  You can make it as long and elaborate as you wish – wrap two or more if you want.

11.  Now you want to put it all together.  It’s easiest if you can put a fishing line loop from the fork handle and hang it from something before you start to hang and knot each piece.  Start with each fork prong loop and attach fishing line (about 8 inches) from the loop on the fork  to a loop on the strainer and repeat for each fork prong loop – making sure it hangs level.

12.  Then decide how long you want each piece of silverware to hang and attached each piece.

13.  Now attach each piece of driftwood.

Driftwood Windchime

14.  Attach the seaglass pieces.

15.  Finally, go back and apply glue to each knot to make sure they do not come apart.

2ND DRIFTWOOD WINDCHIME VERSION

Below is another version using a different strainer, clear marbles (also from Wal-Mart), a dime store windchime I took apart, and driftwood pieces I made myself following this method How to Make Your Own Driftwood.  I actually like this second version better.  I ended up using a small baby spoon in the center and glued several of the marbles on the top of the strainer.  The strainer was larger.  I also used a stronger beading wire.  There’s so many options you can use to make your own version.

driftwood windchime

driftwood windchime

Dimestore windchime I took apart and used the chimes

driftwood windchime

I found two different versions of this strainer – the wooden one obviously cheaper and easier to take apart.  This worked great.  Just follow the same instructions for version one but use this second, larger strainer as your base and take apart the dime store windchime to use those chimes in place of the silverware.  I did however use one silverware fork for the top piece and another spoon for the very center of the chime.   And finally, I used marbles in place of sea glass and attached 5 marbles as a decorative element on the top of the strainer which I thought added a nice touch.


Creating a Driftwood Finish With Paint

Creating a Driftwood Finish With Paint

Driftwood Finish with Paint

I used this technique for creating a driftwood finish with paint, which I confess I garnered from another website some time ago and unfortunately, I do not remember where.  But, I do remember the process and it worked quite well for me in getting that driftwood look.

I started with just two different driftwood-like colors of flat, water-based latex paint, plus a small amount of  basic black and white artist’s acrylic.  The black and white were just from small tubes of acrylic paint I had on hand for painting on canvas.  You will only need a small amount of the white and black so just buy small tubes if you don’t already have some water based latex or acrylics on hand.

Sherman-Williams Grays Harbor

Sherman-Williams Pavestone

Pick the two colors you want from any assorted flat, water-based acrylic grays, beiges, sand or dark creams at the paint store that you feel will give you the colors and shades to mimic a driftwood finish.   I chose a quart each of 6236 Grays Harbor and 7642 Pavestone latex flat paint & primer both from Sherwin-Williams’ SuperPaint collection.  So now you have Grays Harbor and Pavestone.

But you want to have more colors to work with and in order to achieved additional tints and shades I merely added a little of the white or black to Grays Harbor and Pavestone.  Pour a small amount of Grays Harbor into a plastic cup or container and mix in a small amount of white paint to achieve a lighter tint – we now have Grays Harbor Light.  Do this again using Pavestone as your base and you will create Pavestone Light.

Now pour some of Grays Harbor and Pavestone in yet two more separate containers and add a small amount of black to each to get a darker shade of Grays Harbor and Pavestone.  You now have Grays Harbor Dark and Pavestone Dark and a total of 6 different driftwood colors for creating a driftwood finish.  Truthfully, I believe I only used 4 of the colors on my project but you now have lots of different shades and tints to work with and you can create as many as you want using this method of adding varying amounts of white or black to your base driftwood colors.

cat in bookcaseThis dresser was originally black with a beautiful antique gold stencil pattern but, while it was once one of my favorite pieces, it no longer suited my new driftwood color scheme and beachy style.  I went from British West Indies with its dark woods, burnt orange painted walls and vibrant tropical colors  to subdued sand-toned walls and creamy beach theme with driftwood furniture and accessories.  In the interim, before I decided on trying a driftwood finish using paint, I had given the dresser a distressed white finish.  It was nice but  I knew I could do better.  I wanted that highly sought after driftwood finish and I also really liked a lot of the mirrored furniture I was seeing.  Why not combine a driftwood finish with mirrored drawer fronts?

After mixing my paint colors, the procedure went as follows:

1.            First, I used the Grays Harbor and painted the whole piece.  Since I had never put any type of finishing product on the piece after I had painted it white,  all I needed to do was scruff it up a bit with sandpaper to get some good paint adhesion and paint over the white with the gray.

2.            Next, I took the darkest gray shade Grays Harbor Dark and made it a glaze by adding equal part water.  I used a soft cloth and went over the areas of the legs where you can see the carving so that the darker shade got into the grooves.  Don’t let the paint sit – you have to move quickly and wipe off most of the paint that has not settled into the grooves.

3.            I then made a glaze from the Pavestone base color.  Again, ½ water and ½ paint to make the glaze.  I applied this layer in small areas of the piece with a brush and worked quickly to blend and soften the paint using a soft cloth – taking off quite a bit of the glaze as I went along.  I slowly did this to the whole piece.

4.            The next layer was the Pavestone Light.  Again, I made a glaze of ½ paint and ½ water.  I applied this layer using a very dry brush technique and very long brush strokes with a very light hand.  I didn’t apply a lot – just a little here and there until I was happy with it.

5.            For the final touch, I diluted black paint and a little water and, with a toothbrush and my fingers, I flecked the surfaces of the dresser with just little black specks here and there.

6.            When I was done, I used Driftwood Natural Beeswax Wood Butter to give it a nice soft protective finish.

After several attempts at finding just the right knobs, I finally chose mercury glass knobs from Anthropologie.

I couldn’t be happier with how the finish came out and how the final piece looks.  But I will note two things.  First, as nice as this painted driftwood finish looks – I could have used the Driftwood Weathering Wood Finish and got just as nice if not nicer driftwood finish in a lot less time and without all the paint and cleanup, but, I hadn’t developed the product yet and, in fact, this project inspired me to find an easier alternative; and  second,  having the mirror put on the dresser fronts may not have been the best idea.  While it looks great (I had them done by a local glass and mirror shop), the mirror is very heavy and prone to crack if you put the handles on too tight or if you move the piece a lot like I have.  The mirror on two corners has already chipped and cracked.  I had really, really wanted antiqued mirror, i.e. smoky, aged and distressed but I could not find any locally so that was disappointing.  This piece would have been over the top if I had been able to use antique mirrors as I originally wanted… sigh.

Creating a Driftwood Finish with Paint

Creating a Driftwood Finish with Paint

Step by Step Directions for Making a Driftwood Lamp

Step by Step Directions for Making a Driftwood LampDriftwood Lamp Instructions Step 1

A driftwood lamp is one of the simplest things you can make with driftwood – don’t be intimidated.  You would really have to work at it to make a driftwood lamp that DOES NOT look good.  It’s a matter of placing and attaching the driftwood pieces in a position that you find pleasing to the eye.   But, first things first – find yourself a lamp base that you want to use or buy a kit with all the necessary pieces.

1.  Gather your Driftwood.  If you don’t have a local source, we have driftwood available in varying sizes.  There are also other sellers on Etsy with varying prices.

2.  Find your Lamp.  For the lamp I’m working with here, I found the lamp at a thrift store for $8.00 and tested it before leaving the store to make sure it still worked.  This particular lamp was an easy one to work with as it was just a metal rod sitting on a metal base.  What I particularly liked was that it had a pull chain on/off switch.  Find a lamp that is the right height for the pieces of driftwood that you will be working with and one that you can easily take apart down to the rod.  Some lamps will not have a rod but that’s okay – a creative mind will be able to use driftwood pieces to create a base.  In that instance, you could use long thin driftwood pieces like we are using here or you could use unique and bulkier pieces to create your base and you won’t have to try to hide the rod.  Just make sure your driftwood lamp base is stable.

3.  Supplies. 

Glue – I used Aleene’s 7800 Adhesive which I purchased at a big chain hardware store.  Choose a glue that will adhere to both wood and whatever your base is made of, in my instance it was metal.  The glue needs to dry clear and it’s really helpful if it bonds quickly.

Masking Tape – any painter’s or masking tape will do – you just want to secure the driftwood pieces in place while the glue dries.

4.  Start Gluing.  Get an idea of what driftwood pieces you may want to use and how you want to place them around your base.  Start gluing one by one.  


5.  Wrap with Masking Tape.  When you’re finished gluing, carefully wrap with masking tape to hold you pieces until the glue dries.  Overnight is good.  In my case, I glued one round of pieces and let dry overnight.  The next day, I decided to add more pieces.


6.  Final Touches.

If you didn’t like the metal base or just wanted to add a little something more, here are a few ideas to personalize your driftwood lamp, but remember “less Driftwood Lamp instructionsis more”.  Simple driftwood lamps are quite beautiful with just the driftwood.

Sand – Use a white glue such as Elmer’s and brush it all over the base.  Pour fine white sand onto the glue until the base is completely covered.  You can build up the sand by layering, letting dry and then coat again with glue and sand until you’ve build up several layers.

Sea Glass – Glue sea glass pieces onto the base with a clear drying glue.

Shells – Dig out that shell collection you’ve had for years and start adhering shells with clear drying glue.  Keep it simple and don’t go overboard.

Moss – Find a moss that you like and glue the moss in between the driftwood pieces all around the base.  This adds more of a “woodland” look rather than seashore but still has a nice natural look to it.

Now that your lamp is finished, you need to find a lamp shade.  I’m on the hunt for the perfect white shade for my new lamp as I think it will look better than this patterned lamp shade.Driftwood Lamp instructions

For more driftwood lamp styles check out create a driftwood lamp and simple candleholders using driftwood. It only takes a little imagination to put some eclectic lighting into your living space. You’ll save hundreds of dollars on what it would cost for a similar driftwood lamp and you’ll have the satisfaction of knowing that you can create a driftwood lamp yourself.

Where to get driftwood

Where to Get Driftwood

Use driftwood to create all sorts of beautiful items, such as mirror or picture frames, lamps, rustic-looking clothes hangers, candleholders, or even excellent centerpieces for weddings and focal pieces for landscaping.  The list is endless if you use your imagination. But most of us don’t live right on beach so where do you find driftwood. If you’re interested in collecting driftwood as a hobby, or as a way to make some extra cash from time to time, then read on, and learn how and where to get driftwood treasures.

It’s actually pretty easy to make your own driftwood at home and we’ve created an easy tutorial.

Where to fine driftwoodBuying Driftwood

One of the advantages of buying driftwood in person, is that you can look at the pieces and choose the ones that best suit your project. Driftwood pieces of all shapes and sizes are available from craft and hobby shops, florists, souvenir shops, aquarium shops and at flea markets. You can also buy driftwood on eBay, and at many other online stores.

The downside about buying pieces of driftwood online is that they can sometimes be rather pricey, especially when you consider shipping. Pieces can be big and heavy, and shipping costs can add a significant amount to the actual price of the item. Prices vary a lot but you need to keep in mind the shipping costs. 

Our Driftwood Storewww.LittleDriftwoodStore.com for driftwood pieces from 2" - 12"

DIYDriftwood now sells driftwood pieces good for making projects such as candleholders, birdhouses, mirrors, and other items where you might need pieces ranging in size from 2″ to 12″.  

Etsy.com is also a good source for different size pieces of driftwood at reasonable prices.  Also check Ebay and even Amazon.

Where to Find Driftwood That Won’t Cost You a Cent

Finding your own driftwood won’t cost you anything and is a great way to spend a few healthy hours in the outdoors – either on your own, or with your family or friends. This is because most driftwood is found along riverbanks, at the edges of lakes, or along the beach. It’s a misconception that driftwood is only found on a beach. Riverbanks and around lakes are all good places to get driftwood.  I’ve even found beautiful pieces in swamps – I believe this is referred to as “bogwood”. Once cleaned and dried, I actually had some very unique driftwood or “bogwood” pieces. Some were even petrified wood.

The best time to find driftwood on the beach is early in the morning, late afternoon, after a storm, or when it is low tide. All sorts of debris washes up onto the beach, including rusty nails and jellyfish. It’s a good idea to protect your feet with a pair of beach shoes.

You may also have to do a bit of digging through the debris and sand to get to a piece of driftwood that catches your eye. If you don’t like getting your hands dirty, bring along a pair of gloves as well. Having a bag is a good idea, because those prized pieces of driftwood become rather awkward to haul around as you stroll along the shore. I see a lot of beautiful driftwood pieces here in Florida when I kayak in the coastal areas. Unfortunately, my kayak cannot hold the larger pieces I’d love to bring home. These are the times I wish my kayak was a canoe or skiff.

Protected Areas

Be aware that some areas are protected and you are not allowed to take driftwood. Beware of protected natural areas, parks and private property. Public beaches and waterways are usually fair game. 

Once you find a great spot, you may be the one selling to others on line and making a handsome profit. Some pieces are so unique and beautiful that they can fetch a hefty price from a willing buyer. You may need to clean your driftwood before using or selling it.

Knowing where to find driftwood and having a great imagination will allow you to create your own beautiful and interesting pieces of art. Use your pieces for your home or to sell online, at a craft show or flea market.

If turning a flea market find into a beautiful piece of driftwood furniture is more what you’re looking to do – try applying Driftwood Weathering Wood Finish to bare, unfinished or sanded wood.

Gator on Driftwood
Be brave… sometimes you might have to fight for that perfect piece of driftwood. On the otherhand, it wasn’t that great of piece anyway…

How to Refinish Driftwood

To me, the beauty of driftwood comes from having its surfaced worn away, bleached and sculpted by the elements.  Real driftwood would never have an intact shiny finish.  I definitely prefer a non-shiny finish in the pieces I create from actual driftwood found along the shore or even furniture pieces I have stripped down, sanded and re-created with a driftwood finish.  Nonetheless, there are times when you may want or perhaps need a protective finish like when you have a tabletop that will get lots of use and will be subjected to water marks if not protected.

I’ve contacted many woodworkers and companies that specifically make finishes in an ongoing quest to find a good product that would ultimately protect the finish while not darkening the color.

A lot of people will use polyurethane on their driftwood furniture or even driftwood sculptures.  This is one of the worst looks in my opinion.  The polyurethane tends to be heavy and makes it look artificial and plastic-like.  So what does one do?

I have found that lighter woods such as pine or birch handle some protective coatings better than others.  And by better, I mean the color you get once you apply the protective finish does not get as dark as other woods, but still gets darker.  I tried a product called High Performance Top Coat by General Finishes in a satin finish and I applied it over the Driftwood Weathered Wood Finish used on a piece of pine, birch and walnut.  I was happy with the outcome on the pine as it was only 1-2 shades darker, but the walnut was 10x darker and even the birch became too dark for my liking. So, I would recommend this finish if your driftwood piece is pine.

I also tried another product called Safecoat® AcriGlaze Matte by American Formulating and Manufacturing (AFM), a company dedicated to safe green products.  I ordered a sample bottle and tried the product on different sample boards of pine, birch and oak over the Driftwood Weathered Wood Finish.  I was very happy with the results considering everything else I have tried produced a very dark finish.  With the AcriGlaze Matte, I could see where I had applied the product but it really didn’t darken it by much and left no shine.  On some samples, I could not even tell I had applied any finish at all.  I am impressed with this product and would recommend it for use on bare driftwood or over a driftwood finish.  The above link will take you directly to Amazon where it can be purchased in quarts or gallons but make sure to get the matte finish.

Here is a description taken from their PDF:

DESCRIPTION: Safecoat® AcriGlaze is a special mixing medium and finish suitable for use in the display, art and show fields. It is mildew resistant, odorless and dries clear. Ideal for restoring old finishes to their original brilliance, sealing and preserving painted work, faux finishing and as an adhesive for paper mache. Dries clear. Available in gloss and matte sheens. USE ON: Clear finish for masonry, brick, plaster, wood, paneling, etc., where a soft low luster finish and sealer is desired. May be used both interior or exterior as a reducer for any type of waterbased paint. Excellent medium for artist colors and universal tints.

After trying many products, we came to realize that the best way to preserve the color of the Driftwood Final Finish Liquid Waxfinish was to use a product that does not contain solvents or oils.  They can be hard to find which is why we also decided to release our Driftwood Final Finish Liquid Wax.  It contains no solvents or VOCs but does contain carnauba wax for a very hard and durable finish, plus it’s in liquid form so it’s easy to apply and the finish is a soft satin finish.  It usually takes about two coats and that depends upon how thirsty your wood is.  Driftwood Final Finish Liquid Wax 

If you still want to finish driftwood so that it is protected and preserved for years to come, and don’t mind the “shiny” look –  read on.

refinishing driftwood

Step 1: Smoothing the Surface of the Driftwood

You will need to begin by smoothing the surface of the wood using something like a 220 grit sandpaper to take off any rough spots. Nature will already have done most of the hard work for you, but there are usually a few spots that need a little bit of extra work. If the particular piece of driftwood you are working with has any sharp or broken ends, then these too need to be sanded away, to create a rounded and smooth surface.

Step 2:  Pre-Treating the Driftwood

Next, you will need to treat the wood before it can be stained – if indeed you are going to stain the piece. For this you can use a wood conditioner, but do not apply it directly to the wood. Instead, soak a cloth in wood conditioner and then rub it into the surface of the driftwood. Once the wood has been generously coated, leave it to dry for 15 or 20 minutes. Some people are tempted to skip this stage and move straight on to staining their piece. Do not be tempted to do this. Applying a wood conditioner is essential to ensure that, when the stain is added, it will create an even finish.

Step 3: Applying the Stain

Time to apply a stain to your wood. You will want to put on rubber gloves for this step, so that you don’t end up with stained hands and, as with the wood conditioner, put the stain onto a cloth first, and then rub in into the wood. Apply any stain with a circular motion and rub it well into the wood. Once applied, leave the stain to soak in for between 5 and 15 minutes, depending on how deeply stained you want the wood to be.

Once you have the color you are looking for, rub any excess stain off using a dry rag, and set the wood to one side for several hours, until the wood is dry when you touch it and no stain comes off when you run your fingers along the surface.

Step 4: Applying Polyurethane

The final stage is to apply two thin coats of polyurethane to the whole surface of the driftwood piece, allowing 6 to 8 hours for the first coat to become dry before applying the second coat.  Keep in mind that applying polyurethane or even beeswax polish will darken your finish considerably.  I would test an area first if possible to make sure you like how dark it will become.

Your driftwood will now last for years and provide you with a wonderful and uniquely sculptured ornament to enjoy.

How to Create a Driftwood Lamp

How to Create a Driftwood Lamp

Making a driftwood lamp is a great way to put your favorite driftwood pieces on display. Whether using one large solid driftwood piece or several small pieces, your new driftwood creation is going to bring plenty of texture and certainly a wonderful naturalness to your decor by bringing the outdoors feeling in. These three simple lamp-building projects can be completed in one afternoon.

Turning a Flea Market Find into a Beautiful New Driftwood Table Lamp create a driftwood lamp

Pick up a basic table lamp from a yard sale or thrift shop, if you don’t already have one that you’d like to redo.

  1. Disassemble the lamp to remove any decorative column so you are left with the metal center rod.
  2. Reassemble the lamp with just the center rod. This is what you will attach your driftwood pieces to.
  3. Gather several slender driftwood pieces that curve slightly outward at one end. The bottom ends will sit on the the original base; the tops will reach just beyond the socket.
  4. Surrounding the lamp rod with the driftwood and attach with a multi-purpose epoxy glue, position the top ends outward and away from the socket.
  5. Top with your favorite lampshade.

When turned on, this light will present a soft driftwood silhouette.

Create a Driftwood Lamp For Your Desk

Create a driftwood lampGet started with an inexpensive lamp kit, a quarter-inch thick wooden base, four wooden buttons and four or more pieces of driftwood of similar length to the base.

  1. Start with a base that’s about nine inches long and three inches wide.
  2. Drill a three-quarter inch hole into the center.
  3. Drill the same width hole through the center of each piece of driftwood. The driftwood shapes can range from flat to round and, for this project, the width or diameter of each piece should not exceed two inches.
  4. Fix the lamp rod to the base by securing it with a washer and nut.
  5. Artfully stack the driftwood horizontally over the rod and onto the base. Once you have happy with the placement of the driftwood pieces, use glue to adhere each piece together so they stay in place.
  6. Work the lamp cord through the bottom of the base, through each piece of driftwood right up to the top of the rod.
  7. Follow the lamp kit’s instructions to wire and secure the socket to the rod’s top end then attach the harp to the socket.
  8. Glue the wooden buttons to the bottom four corners of the base to give enough height to accommodate the lamp cord under the base

Ttop off your new lamp with a complimentary shade.

Driftwood Stands Out As A Floor Lampcreate a driftwood lamp

Bring the outside in and create a driftwood lamp for that special reading nook.

  1. Drill a three-quarter inch center hole into a 1″ thick base that can be 12″ wide by 12-24″ long.
  2. Drill a quarter-inch hole through the side of the base until it merges with the center hole. This will be for the lamp cord.
  3. Run the lamp cord through the hole in the side of the base to the center hole and then work it through a five-foot lamp rod.
  4. Choose as many long pieces of driftwood that you want to use to achieve your look – 25-30 pieces all roughly the same height. Cut the ends of each piece so you have a flat surface.
  5. Decide as best you can where you want to place each piece and drill a wide enough hole into the base about 1/2″ deep to accommodate each piece.
  6. Using a fast acting epoxy glue, glue each piece into their respective drilled holes until you achieve the look you want. Make sure the glue doesn’t seep out onto the top of the base although if it does, you could easily disguise it with pieces of moss.
  7. The brass rod should extend at least four inches above the top of the driftwood.
  8. Finish as per the instructions for the desk lamp.
  9. Top it off with a complimentary shade and you’ve created a beautiful new driftwood floor lamp.

Driftwood lampNeed pictures to go with the step by step directions?  Check out Step by Step Directions for Making a Driftwood Lamp. There are countless other ways to create a driftwood lamp, chandeliers, floor lamps, wall sconces and simple candleholders using driftwood. It only takes a little imagination to put some eclectic lighting into your living space. You’ll save hundreds of dollars on what it would cost for a similar driftwood lamp and you’ll have the satisfaction of knowing that you can create a driftwood lamp yourself.

For more driftwood projects, check out 5 Easy Creative Driftwood Projects you Can do at Home.