Make a Driftwood Ball

Make a Driftwood Ball

How to Make a Driftwood Ball

Very simple tutorial to Make a Driftwood Ball or Driftwood Orb.

Make a Driftwood Ball

 Materials Needed:

Pro Hot glue gun or Titebond HiPur Adhesive Applicator Glue sticks – professional glue such as:

  • Titebond Wood to Wood WW60 or WW30 (for use with Titebond HiPur Adhesive Applicator)
  • Ad-Tech Wood Glue Sticks
  • All Temperature Wood Stik
  • 100 or more 2″-6″ driftwood pieces.  If you need driftwood pieces, we have driftwood in stock. 2-6″ pieces or 5-12″ pieces.
  • Balloon or beachball.  (Use extra strong balloons)

How to Make a Driftwood BallI wanted my driftwood ball to be about 10-12″ in diameter so I had to use a balloon.  I found “Punch Ball” balloons at Walmart for about $3.00 for a package of 8 which were strong enough and allowed me to get the size I wanted.  Once a blew up the balloon to the size I wanted, I tied it off so that I would be able to untie it easily enough to let the air out slowly when I was done instead of just popping the balloon.  My driftwood ball is about 10″ in diameter and I used 100 pieces of driftwood for my project.

How to Make a Driftwood Ball

How to Make a Driftwood BallI started by actually gluing a driftwood piece directly to the balloon just to hold it in place.  Keep in mind that once you let the air out of the balloon, it will continue to stick to the glue so you want to use as little glue as possible to hold it in place on the balloon and as few times as possible gluing directly to the balloon.  I believe I glued directly to the balloon 5 times.  The less you can do it the better.  Ideally, you want to glue just on the driftwood pieces.

And it’s important to use a professional hot glue gun and professional grade glue sticks or the piece will not stay together.  If you don’t want to use a glue gun, you can use any glue that will give you a quick and permanent adhesion – “quick” being the operative word here.  You don’t want to be holding the pieces in place and waiting for them to dry.

If you live in a hot, humid climate like Florida, you will find that regular glue sticks will not hold up and your driftwood orb will quickly fall apart so it is important to use professional glue for “all temperature”.  This will also allow you to use your driftwood ball outside without it disintergrating.

How to Make a Driftwood Ball

How to Make a Driftwood Ball Continue making your way around the balloon and filling in the spaces with driftwood pieces until you like what you see.

How to Make a Driftwood Ball
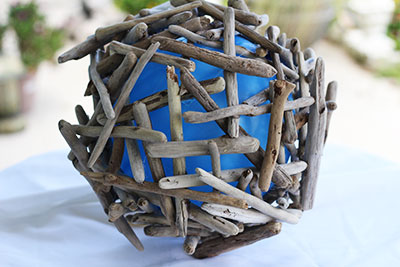
Find where you tied your balloon and untie it then slowly let the air out.  It should pull away from the glued sides but it will leave behind some pieces of balloon that will be difficult to remove unless you used as little as possible to hold it in place.

How to Make a Driftwood BallThere you have it – a beautiful driftwood ball that you made in about 2 hours.

Once you’ve created your driftwood ball, the possibilities are endless as far as what you can do with it. Certainly, it’s decorative and quite textural by itself but add a string of LED lights or even just one bulb and you’ve got a unique light source.  Attach dirt wrapped in moss using wire or fishing line and insert some succulent  plants and you’ve now got a unique planter.  Or just use it as a sculptural garden element.  Whatever you decide, you now have a clever and decorative driftwood element.

Make A Driftwood Sailboat

Make a Driftwood Sailboat

This simple tutorial will show you how to make a Driftwood Sailboat.  It’s actually pretty simple and they make really cute and beachy accents to any room where you want to add a beach or natural weathered wood theme.  They also look great as a juxtaposition to a sleek and modern room where you want to create some unexpected visual interest.

driftwood-sailboat-6b

What you Need to Make Your Driftwood Sailboat:

  • Driftwood piece that is linear shaped.  If you need driftwood pieces, we have driftwood in stock. 2-6″ pieces or 5-12″ pieces.
  • White Embroidery Thread
  • Embroidery Needle
  • Old Handkerchief
  • Singer’s “Fray No More”
  • Dowel or Stick of Driftwood
  • 2 Small Eye Screws
  • Drill
  • Scissors
  • Wood Glue

1.  Select your driftwood piece.

I glued together these two pieces as I thought the smaller looked great on the nose of the sailboat.  You can use a dowel purchased from the hardware store like I did or you can use a driftwood stick.  Since my dowel was too pale, I used Driftwood Weathering Wood Finish to get a weathered wood look on the dowel and I also used it to touch up any areas that may have broken off or where I drilled to keep the weathered wood look.

Driftwood Sailboat

2.  Create Your Driftwood Sailboat Mast.

Cut your dowel or driftwood stick to approximately 12″ although this will depend upon the length of your boat base.  Use your own discretion as to what looks best.  Then drill a hole deep enough in the center of your boat base to hold your mast.

Driftwood Sailboat

3.  Eye Screws.

Insert your eye screws in the boat base at the front and back.  These will be used to hold the sail in place.  On my first sailboat, I actually used glue instead and curled the sails before tacking them in place with glue but on the second sailboat I held the sails in place with the embroidery thread and eye screws.

Driftwood Sailboat

4.  Prepare Your Driftwood Sails.

Layout your sail and cut it to form two sails.  I had discovered an old box filled with and assortment of antique lacy and printed handkerchiefs in the attic which inspired me to do this project.  I just thought they would make such pretty sails and a great decorative focal point especially if I made three.  Here you can see my dowel piece is still a little bit too long for this handkerchief so I either need to cut it shorter or choose a different handkerchief for the sale.

Driftwood Sailboat

 5.  Create Your Sails.

Cut your handkerchief to form two sails.

Driftwood Sailboat

6.  Stop the Fray.

Once you cut your sail, you will want to use “Fray No More” by Singer to stop the edges from fraying.  Just run a bit along each cut edge.

Driftwood Sailboat

7.  Attaching the Mast and Sails

Glue your mast in place.

Use your embroidery thread to attach the sail sections to the mast – first the top and then the bottom.  Then attach the sail to the eye screws in the front and back if you want the sail to stay displayed.  I also starched the handkerchief so they would be nice and stiff.

Driftwood Sailboat


See how simple that was?  Now enjoy your sailboat – heck, make a fleet of them!


Using Driftwood in a Wedding or Party Theme

Using Driftwood in a Wedding or Party Theme

By Kim Foster

Whether you’re planning a romantic barefoot wedding at the beach or you’ve simply chosen a nautical theme party, using driftwood in a wedding or for your party is one of the most dramatic elements available for your party décor.

Not only is driftwood naturally-occurring and often obtainable for free, but it also adds a perfectly casual yet classy touch to your special occasion. Plus, as an added bonus, driftwood stands up to wind and weather, unlike expensive fresh flowers that will wilt in the heat. Check out these clever ideas for using beautiful, eco-friendly driftwood for your wedding or party.  If you don’t have driftwood available to you locally, check out this tutorial on how to make your own driftwood, or these online sources for obtaining some good driftwood pieces online to get your projects started. Recommended from Amazon for creating Driftwood Furniture including driftwood arches – great for a wedding. Driftwood Furniture: Practical Projects for Your Home and Garden

•    Driftwood Menus

Adding driftwood to your special event menu is a lovely way to add the driftwood theme to your tablescape.  Buy inexpensive frames that have a back stand, make copies of your menu and insert into the frames, then attach driftwood pieces using a hot glue gun and your done.  When the party is over, remove the menus and add your favorite photos from your special event.

Using Driftwood in a Wedding
    •    Driftwood Sailboats

Use simple Driftwood Sailboats as table décor.  Follow these simple instructions for making these easy driftwood sailboats which look amazing when added to any beach themed wedding or party décor and are super easy to make.  Surround your sailboats with other driftwood pieces, shells, candles, sand flowers and you have your simple yet elegant and inexpensive table decorations.

Using Driftwood in a Wedding

•    Driftwood Arch

To begin with the most obvious and yet one of the most striking uses of driftwood, consider exchanging vows with your beloved under a driftwood arch.  Driftwood arches range from stark and simple to breathtakingly intricate, and are easy to enhance in many ways, should you choose. You can cover the entire piece with greenery, or add fabric or ribbons to flutter in the ocean breezes. LED lights wound around the arch look lovely for a nighttime wedding, bringing that radiant glow to your face and that of your intended.

driftwood arch

•    Driftwood Vases

You can just easily make a driftwood vase for holding flowers as you can a driftwood candleholder – the same technique is used.  Find a large cylinder glass vase – clear or even a pretty seaglass color that will show through will work just fine and attach it all the way around using a hot glue gun then just add your choice of flowers.

Driftwood vase

•    Driftwood Signs

Signs are often used to point the way to the ceremony or reception, to urge guests to “Choose a seat, not a side,” or simply to display the names of the bride and groom with a loving message or a romantic quotation underneath. Driftwood signs look right at home in any natural or “shabby chic” venue, and are easy to personalize by painting freehand or using stencils. Driftwood can also be used to frame chalkboards, and messages in chalk can of course be erased after the big day, so you can continue to use the signs in the future.

Driftwood signs

•    Place cards

Search online for “driftwood place cards” and you’ll find so many artful ideas you won’t know which to pick. For starters, you could decide to paint or carve each guest’s name directly onto a small piece of driftwood, creating for each person a unique wedding favor as well as a placeholder. If painting or carving seems too labor-intensive, you can cut small slits into pieces of driftwood to hold handwritten name cards, or drill tiny holes into any small, irregular pieces of wood and insert wire card holders.  This idea from June Bug Weddings.  Photo by Harrison Studio

driftwood placecards

•    Driftwood Candleholders

If you’d like to add a cozy ambiance to your tables, driftwood can be used to make candle holders in countless imaginative styles. If you have a long driftwood log at your disposal, small divots can be cut into it to hold tiny tea lights. You might also arrange sticks of driftwood vertically around a glass candle holder, or directly around a wide candle itself. They can be decorated with ribbon, though twine or thin rope would also be in keeping with a nautical or beachy feel.  For a tutorial on how to make driftwood candleholders click here.

 driftwood candleholder

•    Driftwood Garland

When frilly bows and ribbons just won’t fit in with your theme, you can add a truly unique finishing touch to your wedding décor by creating driftwood garlands. Whether natural colored or whitewashed, a collection of driftwood twigs can be strung together and draped from furniture, laid casually on a tabletop, or used as a tie-back for fabric. Add a few sand dollars, shells, or starfish to turn it into an idyllic seaside accent.

driftwood garland

•    Driftwood Chandelier

For the more ambitious decorator, nothing says “drama” like a handmade driftwood chandelier. The idea is more do-able than you think, and like so many driftwood items, you’ll find that chandeliers can range from intricately entangled sculptures, wired for electricity, to  plain driftwood sticks used to suspend candles in beautiful holders. Metal candle holders are often used and mason jars are popular, too, but any colored glass container can add interest to the piece and tie in with your wedding motif as well.

driftwood chandelier •    Driftwood Cake Display

If you can find the right piece of driftwood, it can be a clever display to highlight a beautiful wedding cake, champagne fountain or food tray.  Make sure your unique piece is capable of holding the weight of whatever you want it to hold and then properly balance and support it for a spectacular driftwood  display your guests will be talking about for years.

Cake on driftwood

•    Driftwood, River Rocks and Flowers

There’s something simple yet serenely beautiful about smooth stacked river rocks and purposefully placed flowers against a backdrop of driftwood that will set the tone for a beach themed wedding.  Hot glue them together so they stay attached then artfully place them on your guest tables or scatter them about your reception area to set a sea inspired zen like ambiance complete with driftwood, flowers and river rocks. 

driftwood and river rocks

 •    Driftwood Centerpiece

Use driftwood as your centerpiece.  Driftwood is naturally beautiful and can easily stand alone as a piece of sculpture or use it as an integral part and incorporate it along with other natural elements.  Include flowers, stones, shells, intertwined or sculptural driftwood and candles.  Simplicity is key.  It doesn’t need to be elaborate to be beautiful.  And don’t forget to add a hint of your colors for your special day, event or the season your celebrating.

Driftwood centerpiece

The allure of driftwood lies in the history each fragment holds. Once young and green, every piece has traveled far and changed much from its original form. Tossed by the waves for many years, it has finally landed on the sunny shore—time-worn, but still strong and beautiful. There is no better symbol for an enduring marriage than driftwood!

Make a Whimsical Driftwood Birdhouse

Make a Whimsical Driftwood Birdhouse

How to Make a Whimsical Driftwood Birdhouse

Make a Whimsical Driftwood Birdhouse

Simple tutorial will show you how to make a whimsical driftwood birdhouse for indoor or outdoor use.  Add charm and character to your garden with a whimsical driftwood birdhouse you make yourself.

Supplies

  • Driftwood pieces – 5-12″ round and flat plus assortment of other pieces. If you need driftwood pieces, we have driftwood in stock. 2-6″ pieces or 5-12″ pieces.
  • 18 oz. oatmeal carton or similar cardboard carton
  • Titebond WW30 or WW60 (for use with HiPur Adhesive Applicator) or Ad-Tech Wood Glue Sticks or All Temperature Wood Stik (look for glue sticks that will hold up in all temperatures)
  • Heat Gun such as HiPur Adhesive Applicator by Stienel or Professional Glue Gun
  • wooden stand (optional)
  • wooden round 5″ – 8″ (optional)

Make a Whimsical Driftwood Birdhouse


Make a Whimsical Driftwood Birdhouse

I used an 18 oz. oatmeal box but pretty much any similar cardboard box, round or square, will work.  Remove the advertising so you just have the brown cardboard.

Make a Whimsical Driftwood Birdhouse

Cut out a hole for the door and any additional “windows” you might want.

Make a Whimsical Driftwood Birdhouse

Then just fit and glue your pieces around your form.  You can use flat or round, long or short – just cover your form.

Make a Whimsical Driftwood Birdhouse


Make a Whimsical Driftwood Birdhouse

Once the form is covered on the sides, you can start on the top.  I wanted mine to be off-centered and longer on one side which would give it a more whimsical look so you can see I started with a long piece on one side propped up by a shorter piece on the other.  From there I just started filling in areas.  It’s like a puzzle where you find the best pieces to fit and pieces that will add some character here and there.

Make a Whimsical Driftwood Birdhouse

Here is a view from the back.  Once again, I just started layering smaller, flatter pieces on the roof until I had it completely covered.

Make a Whimsical Driftwood Birdhouse

In the front top I added a post that protruded out so the birds would have a perch and other little unique pieces that just fit well on the top.  I then added a “front porch” so to speak and a piece on the right that ended up looking almost like a handle.  I found a unique driftwood piece that was like a curly little pig’s tail and added that coming down from the top and one more piece to balance the left side and I was finished with my whimsical little birdhouse.  It was hard not to keep going by adding more little pieces here and there. 

Make a Whimsical Driftwood Birdhouse

The final thing I did was use the Driftwood Weathering Wood Finish on the base so it would look more weathered.  You can see the difference in the very top picture where it blends in very well with the regular driftwood.

And there you have it.  So cute in a garden or just on display.  Since I used Titebond WW30 HiPur Hot Melt Adhesive, I can use my birdhouse outside. 

Make a Whimsical Driftwood Birdhouse


Ideas for Landscaping with Driftwood

Landscaping with Driftwood Archway

Landscaping with Driftwood

Landscaping with driftwood starts with a good plan and a some imagination. Since driftwood is already a work of nature, it’s not difficult to cohesively work it in somewhere as either a focal point or complimentary element with your existing natural environment.

Driftwood can easily be carved, sanded and finished to get the shape, texture and look you’re after or just leave it as is. Whether using smaller-sized pieces for projects like birdhouses or larger pieces to make sculptures or lawn and garden furniture, you’re guaranteed to end up with items that are completely unique since no two pieces of driftwood will ever be alike in shape, texture and color.

For instance, if you want to give visual height to an area, create planters from a combination of driftwood and airplants, orchids, succulents or bromeliads then attach them to a wall or tree and watch your new plants happily make themselves at home in the cracks and crevices of the driftwood. Your wall will soon be teaming with carefree greenery, shoots and flowers and become a focal point.  The same idea can be used to create a horizontal focal point.

driftwood fencingLandscaping with driftwood can add visual interest and a focal point to areas that are frequently overlooked or otherwise seem to lack purpose and have no existing appeal. Imagine a large piece of driftwood where others might plant a tree or embed a large boulder – then surround your new sculpture with sea grass or wild flowers.

Think about adding a large driftwood pieces to a pond or other water feature you may have for a natural look. Driftwood on its own could make a unique and beautiful water fountain with the right tools and a little imagination.

Bind together long pieces of driftwood and attach a box to the top for a one-of-a-kind mailbox or create a driftwood Landscaping with Driftwood Benchchandelier for outdoor hanging in a special garden nook. Use it with candles or drape it with pretty flowers or vines.

How about creating driftwood retaining walls for flower beds or around trees by using 8″ linear pieces and sinking them into the ground. You can also create a heavier retainer wall with larger driftwood logs set end to end.

Thick, solid pieces of driftwood make wonderful benches or quaint chairs for sitting in unexpected places. Add a handcrafted driftwood table and you have yourself the perfect place to read a book and enjoy your garden while sipping an ice tea. Insert logs into the ground for natural fence posting.

There are a myriad of possibilities for landscaping with driftwood to create interest in your outdoor space. How will landscaping with driftwood inspire you?

Beach Style Decorating Ideas

Beach style decorating isn’t just for coastal beach houses and cottages by the seashore. It can be incorporated absolutely anywhere to soothe the nerves, provide positive energy and lighten the mood. Some simple beach style decorating tips can bring the therapeutic benefits of a vacation at the beach right into your home.Driftwood chair

Start by installing an interior louvre door and painting it a vibrant Caribbean blue or a deep aquamarine. Louvered doors automatically stir thoughts of old casual beach cottages. Next, install some horizontal planking across one wall of the living room or a whole ceiling and whitewash it for an overall beach house ambiance. Continue the aqua colors in accent pillows, comfy throws and an area rug. Toss in the bright orange of a warm beach sunset.

Go boldly into beach style decorating with unusual and unexpected color in the kitchen. Paint the kitchen island an eye-catching sea green and repeat the color in the window treatments. White or shell cabinets and a sea glass backsplash provide just the right amount of contrast while giving you that sand swept beachy feel.

If you’re not that daring, go to the opposite end of the spectrum and make nearly everything stark white. Then paint the wooden floor and the

cabinet doors a subtle sandy color. Easily add some sophistication with the texture of stainless steel appliances and accents. Purchase or create your own accessories with a nautical or coastal theme with using driftwood, shells and sea glass to create the feeling of being near the sea. Hang some artwork depicting the seaside and fill some shelves with picture frames and treasure boxes bordered in delicate shells. Translucent blue glass accents bring the sea inside.

Wall decor made of woven sea grass and random room accents made of wicker strengthen the aura of a retreat by the beach. Driftwood, when adapted as a home decorating accessory, is extremely versatile and lends itself to endless creative ideas. Weathered driftwood can be hung on a wall as is or insert a simple airplant and use as a planter. Equip it with some small hooks and dangle some souvenirs from the beach. Pick up an inexpensive wood-framed mirror and attach small pieces of driftwood around the border.

Gathering several pieces of driftwood that are all near the same length, tie them together with sea grass or nautical rope and stand them on their ends. Use this as the base for holding dried wild flowers. If you have a large section of driftwood, secure it to a wall, attach some hooks and use it as an unusual hat rack. Try making one of our suggested driftwood candleholders or driftwood lamps. Refinish a great flea market find with a driftwood finish by using Driftwood Weathering Wood Finish or one of our alternative homemade techniques.

If you have a pool, construct a backyard open-air cabana. Basically, this consists of nothing but a simplistic frame and a roof-like covering. Add floor to ceiling canvas curtains tied back to each post and create a look that’s as soft as a sea breeze. Add some more lush plants. Fill it with accent pieces that have seaside motifs like palm fronds, shells or marine life.

Outdoors, landscape with solar lighting as a reminder of the sun’s subtle energy. Indoors, adorn a few side tables with a grouping of sand candles.

Lighten up your mood and your atmosphere with beach style decorating. It’s the next best thing to being there.

Creating a Driftwood Finish

If you’re anything like me, you love the look of driftwood furniture. The aged and worn look just appeals to me although most of the pieces I see for sale in the major stores are not actual driftwood but wood that’s made to look weathered, usually with painting techniques.  So I began a quest to find out how I could get that same look at home.  After all, I was experienced at refinishing furniture, painting, staining and distressing – why not try my hand at this driftwood finish look.

And there’s nothing more satisfying than finding a beautiful piece of furniture in a thrift store that someone else has discarded – no longer useful to them.  I’m one of those that can see its possibilities and I’m quick to snap it up, take it home and give it a whole new life.

I found myself a gem of a side table at one local thrift store.  It was perfect.  I stripped off the old stain and finish and had initially decided that I wanted a distressed white look.  After about four months of this distressed white table, I decided I wanted it to look more like a driftwood finish.  I was seeing driftwood tables, beds and lamps, etc. everywhere and I wanted it.

An indepth search on the Internet revealed some very interesting processes that others were using to achieve that driftwood finish.  Some with paint (which I also did and it came out great and you can read that post – Creating a Driftwood Finish With Paint), others with concoctions of vinegar and steel wood and still others using baking soda, tea and coffee.

Along the way, I discovered my own mixture, which I call Driftwood Weathering Wood Finish, and to my surprise, it worked beautifully on that little white table once I had stripped and sanded it again.  But I still wanted to test the other methods I came across so below you will see a video of the five different methods I used on 3 different types of wood – oak, pine and birch.  I will show the initial application and the outcome 24 hours later.

The five methods I use to achieve a weathered wood driftwood finish are:

#1 – Tea – Steeped green tea in 1/2 water for several hours.

#2 – Coffee – Steeped coffee grounds in 1/2 cup water for several hours.

#3 – Vinegar & Steel Wool (3 Cups White Vinegar and 1 steel wool pad – soaked for 45 days, although you really only need to soak it for 24 hours – I just happen to still have a mixture still around from another project);

#4 – Baking Soda & Water (1/4 Cup water to 1/8 Cup baking soda); and

#5 – Driftwood Weathering Wood Finish – which you can now buy here on our website or through Amazon

Watch Video

How to Clean Driftwood

You’ve been lucky enough to find a unique piece of driftwood that you want to use for a project but now how do you clean it?  The forces of nature may have already removed much of the debris and hopefully,  left you a nicely weathered and smooth finish to start with but you still need to be able to remove the dirt, mold, parasites and other critters that may be lingering in your driftwood.

If you’re using your driftwood for an aquarium, you will need to use a natural process to clean driftwood without any chemicals.  If your pieces are small enough, you can boil them but you may split and crack the wood.  A better way to clean driftwood, and one that you can use regardless of whether you use the driftwood in an aquarium or not, is the slow soaking method using distilled water.Clean driftwood

Clean Driftwood Using the Distilled Water Soaking Method

Scrub your wood with a sturdy scrub brush to remove loose debris and surface dirt.  Fill a large container with enough distilled water to cover your wood.  I suppose one could use a bathtub if you don’t have a large container but I’m not sure what may be left behind in your tub once the process is finished.  

The driftwood needs to soak, fully covered, in the distilled water for at least two weeks, and you will need to change the water several times when it becomes dark with the leached tannins.  The tannin is what gives the wood its color and we want to get rid of as much color as possible in this process, along with any other critters.  You can place a large rock or something heavy to hold down your driftwood while it soaks.

After two weeks, remove the wood and place it somewhere where it will be able to dry undisturbed in an environment with low humidity.

Once it is dry, you can use it for whatever driftwood project you wish.

Clean Driftwood Using the Disinfecting Method 

Mix a solution of one part bleach to nine parts water and fill a large container so that there is enough solution to completely submerge your driftwood.  Place your driftwood in the solution.  Soak your driftwood for 3 or 4 days, changing out the disinfecting solution each day.  

Remove your driftwood and let it dry undisturbed in an environment with low humidity.  

You should not use clean driftwood that has been chemically bleached in an aquarium with live plants or animals.

Also see Refinish Driftwood

How to Create a Driftwood Candleholder

Three Simple Driftwood Candleholders You Can Make Yourself

Driftwood Candleholder Style #1Driftwood Candleholder

You will need:

  • enough cleaned driftwood pieces to fit around your glass candle container
  • multi-purpose epoxy glue
  • glass contained candle
  • raffia or twine (optional)

Directions:

For this style driftwood candleholder, you will want to have enough clean driftwood pieces to go around your glass container candle – 10-20 pieces to chose from depending on the size of your glass container . It’s best to use 1″ thick linear pieces rather than awkward shaped driftwood pieces.

Determine how tall you want the height to be. Some prefer the height to be just to the top of the glass while I’ve seen others extend it 2-3

inches taller than your glass container. Either way looks great.

  1. Saw off the ends of each piece so they will line up evenly at the bottom around the your glass container while still giving you the height you want.
  2. Now one by one, line up a piece with the bottom of the glass container and begin gluing. Continue until you have completed the circumference.

Wait until the glue dries according to the package before using.

You may wish to dress up your container with raffia or twine.

A great decorating tip is to create three of these candleholders of various heights for use in displaying.


Driftwood Candleholder Style #2Driftwood candleholder

You will need:

  • Driftwood
  • candles in glass votive holders or tea lights in tin holders
  • drill
  • 1  3/4″ (44 mm)  hole saw – which is a type of bit that will fit on a drill and create the holes (available at Lowe’s and Home Depot)

Directions:

Suppose you have a wonderfully unique piece that is too big to use for the first style candle holder but you really want a driftwood candleholder. If you have a piece that will sit solidly on a flat surface without being “tippy”, then this is a good option for making your unique driftwood candle holder.

  1. Lay your driftwood piece on a flat surface and determine where you might want to put one or more candles. Space them out so they won’t cause a fire hazard when lit.
  2. Once you have identified where you want the candles, mark the center.
  3. Now secure your driftwood and drill your holes using the hole saw drill bit to match the size of your votive or tin candle holders. Drill no more than 1/2″ for tin tea lights. You can drill deeper for votive holders. You want to make sure that the hole is not so deep that a lit candle will catch the surrounding edges of the driftwood on fire.

I’ve seen this style used with elaborate pieces and many candles, as well as with one hole and one simple candle – and they are all beautiful.

Driftwood Candleholder Style #3Driftwood candleholder

You will need:

  • thick cut of driftwood (4″ or more circumference)
  • drill
  • 1  3/4″ (44 mm)  hole saw – which is a type of bit that will fit on a drill and create the holes (available at Lowe’s and Home Depot)
  • glass votive holder or tea light tins

Directions:

  1. Cut both ends of your driftwood so both the top and bottom are flat.
  2. Using the hole saw drill bit, drill a hole in the center of the top deep enough to fit your tin or votive holder.
  3. Insert your votive or tin.

This style looks best when the votive or tin sits almost level with the driftwood surface.

A great tip is to make three of this style in various heights for a great display.

There you have it – a driftwood candle holder style for everyone!

Other projects to try: Driftwood Lamp; Driftwood Sailboat; Driftwood Christmas Tree, Driftwood Windchime, Driftwood Clock

Driftwood Highboy Refinishing Project

Over the past 2 months, I’ve been slowly working on my driftwood highboy refinishing project which meant stripping and refinishing an antique highboy piece and then refinishing it with the Driftwood Weathering Wood Finish.  Well, I’m happy to say it’s finally done and I couldn’t be happier with the results.

driftwood highway
Finished Highboy using Driftwood Weathered Wood Finish

I purchased this highboy piece over 30 years ago at an antique store.  At the time I purchased the highboy, it was a hideous orange toned stained wood but it was a bargain at $375.00.  I distinctly remember that once I had stripped the orange stain, I had made a mental note that the bare wood had a beautiful distressed look to it and even back then I was tempted to leave it that way.  I also remember that I had done a major faux pas at the time I stripped it by using a steel wool pad to remove the finish and it had left little black specks everywhere.  But this had actually contributed to the weathered look in a good way.  I ended up staining the highboy in a dark mahogany color to match the other furniture in my room at the time.  I also remember that the stain did not take very well and I literally had to apply the stain and leave it on the piece without wiping off the excess.  This was the only way I could get the stain dark enough over the maple wood.

Original antique highboy
Original piece

Above is the piece before stripping and sanding.  It has always been a beautiful piece.  Below, I have started to strip and sand and needed to remove some of the more intricate pieces in order to get the finished removed.  I did this work outside in the Florida summer heat – not exactly the best conditions to be doing this type of work and that is why it took me 6 weeks to fully complete this project.  Some days it was just too hot!
Driftwood Highboy

Driftwood Finish Highboy


Driftwood Weathered Wood Finish applied to top drawer but still drying
Antique driftwood highboy
Stripped and sanded; application of Driftwood Weathered Wood Finish.

The original hardware was brass and my original intention was to create a “rusted” finish.  I thought driftwood finish would be a nice backdrop to rusted hardware.  I attempted many solutions to create a rusted finish including soaking the hardware overnight in baths of vinegar and baking soda; vinegar and salt; and ammonia.  While I didn’t get a rust finish, I did get a somewhat verdigris finish.  After soaking the hardware pieces overnight and letting them air dry, I then applied a product by Modern Options called Verdigris with a paintbrush and dried it using my heat gun.  This seemed to increase the verdigris finish somewhat although I did not use the product according to their directions.  I did not apply their base product.  I have since found that the hardware’s verdigris finish has continued to turn quite a bit.

distressed hardward
Distressing the hardware
finished driftwood highboy
Finished driftwood highboy

 Driftwood highboy

So there you have the final driftwood highboy refinishing project.  It came out even better than I had expected and I’m in love with this piece but now my bed no longer matches.  Just when I thought I was done with refinishing projects for awhile…

Step by Step Directions for Making a Driftwood Lamp

Step by Step Directions for Making a Driftwood LampDriftwood Lamp Instructions Step 1

A driftwood lamp is one of the simplest things you can make with driftwood – don’t be intimidated.  You would really have to work at it to make a driftwood lamp that DOES NOT look good.  It’s a matter of placing and attaching the driftwood pieces in a position that you find pleasing to the eye.   But, first things first – find yourself a lamp base that you want to use or buy a kit with all the necessary pieces.

1.  Gather your Driftwood.  If you don’t have a local source, we have driftwood available in varying sizes.  There are also other sellers on Etsy with varying prices.

2.  Find your Lamp.  For the lamp I’m working with here, I found the lamp at a thrift store for $8.00 and tested it before leaving the store to make sure it still worked.  This particular lamp was an easy one to work with as it was just a metal rod sitting on a metal base.  What I particularly liked was that it had a pull chain on/off switch.  Find a lamp that is the right height for the pieces of driftwood that you will be working with and one that you can easily take apart down to the rod.  Some lamps will not have a rod but that’s okay – a creative mind will be able to use driftwood pieces to create a base.  In that instance, you could use long thin driftwood pieces like we are using here or you could use unique and bulkier pieces to create your base and you won’t have to try to hide the rod.  Just make sure your driftwood lamp base is stable.

3.  Supplies. 

Glue – I used Aleene’s 7800 Adhesive which I purchased at a big chain hardware store.  Choose a glue that will adhere to both wood and whatever your base is made of, in my instance it was metal.  The glue needs to dry clear and it’s really helpful if it bonds quickly.

Masking Tape – any painter’s or masking tape will do – you just want to secure the driftwood pieces in place while the glue dries.

4.  Start Gluing.  Get an idea of what driftwood pieces you may want to use and how you want to place them around your base.  Start gluing one by one.  


5.  Wrap with Masking Tape.  When you’re finished gluing, carefully wrap with masking tape to hold you pieces until the glue dries.  Overnight is good.  In my case, I glued one round of pieces and let dry overnight.  The next day, I decided to add more pieces.


6.  Final Touches.

If you didn’t like the metal base or just wanted to add a little something more, here are a few ideas to personalize your driftwood lamp, but remember “less Driftwood Lamp instructionsis more”.  Simple driftwood lamps are quite beautiful with just the driftwood.

Sand – Use a white glue such as Elmer’s and brush it all over the base.  Pour fine white sand onto the glue until the base is completely covered.  You can build up the sand by layering, letting dry and then coat again with glue and sand until you’ve build up several layers.

Sea Glass – Glue sea glass pieces onto the base with a clear drying glue.

Shells – Dig out that shell collection you’ve had for years and start adhering shells with clear drying glue.  Keep it simple and don’t go overboard.

Moss – Find a moss that you like and glue the moss in between the driftwood pieces all around the base.  This adds more of a “woodland” look rather than seashore but still has a nice natural look to it.

Now that your lamp is finished, you need to find a lamp shade.  I’m on the hunt for the perfect white shade for my new lamp as I think it will look better than this patterned lamp shade.Driftwood Lamp instructions

For more driftwood lamp styles check out create a driftwood lamp and simple candleholders using driftwood. It only takes a little imagination to put some eclectic lighting into your living space. You’ll save hundreds of dollars on what it would cost for a similar driftwood lamp and you’ll have the satisfaction of knowing that you can create a driftwood lamp yourself.

Where to get driftwood

Where to Get Driftwood

Use driftwood to create all sorts of beautiful items, such as mirror or picture frames, lamps, rustic-looking clothes hangers, candleholders, or even excellent centerpieces for weddings and focal pieces for landscaping.  The list is endless if you use your imagination. But most of us don’t live right on beach so where do you find driftwood. If you’re interested in collecting driftwood as a hobby, or as a way to make some extra cash from time to time, then read on, and learn how and where to get driftwood treasures.

It’s actually pretty easy to make your own driftwood at home and we’ve created an easy tutorial.

Where to fine driftwoodBuying Driftwood

One of the advantages of buying driftwood in person, is that you can look at the pieces and choose the ones that best suit your project. Driftwood pieces of all shapes and sizes are available from craft and hobby shops, florists, souvenir shops, aquarium shops and at flea markets. You can also buy driftwood on eBay, and at many other online stores.

The downside about buying pieces of driftwood online is that they can sometimes be rather pricey, especially when you consider shipping. Pieces can be big and heavy, and shipping costs can add a significant amount to the actual price of the item. Prices vary a lot but you need to keep in mind the shipping costs. 

Our Driftwood Storewww.LittleDriftwoodStore.com for driftwood pieces from 2" - 12"

DIYDriftwood now sells driftwood pieces good for making projects such as candleholders, birdhouses, mirrors, and other items where you might need pieces ranging in size from 2″ to 12″.  Visit our shop for driftwood pieces.  Shipping is free.

Etsy.com is also a good source for different size pieces of driftwood at reasonable prices.  If you live in Australia and need a source for driftwood you can try ElaLakeDesign an Etsy seller in Australia.

Where to Find Driftwood That Won’t Cost You a Cent

Finding your own driftwood won’t cost you anything and is a great way to spend a few healthy hours in the outdoors – either on your own, or with your family or friends. This is because most driftwood is found along riverbanks, at the edges of lakes, or along the beach. It’s a misconception that driftwood is only found on a beach. Riverbanks and around lakes are all good places to get driftwood.  I’ve even found beautiful pieces in swamps – I believe this is referred to as “bogwood”. Once cleaned and dried, I actually had some very unique driftwood or “bogwood” pieces. Some were even petrified wood.

The best time to find driftwood on the beach is early in the morning, late afternoon, after a storm, or when it is low tide. All sorts of debris washes up onto the beach, including rusty nails and jellyfish. It’s a good idea to protect your feet with a pair of beach shoes.

You may also have to do a bit of digging through the debris and sand to get to a piece of driftwood that catches your eye. If you don’t like getting your hands dirty, bring along a pair of gloves as well. Having a bag is a good idea, because those prized pieces of driftwood become rather awkward to haul around as you stroll along the shore. I see a lot of beautiful driftwood pieces here in Florida when I kayak in the coastal areas. Unfortunately, my kayak cannot hold the larger pieces I’d love to bring home. These are the times I wish my kayak was a canoe or skiff.

Protected Areas

Be aware that some areas are protected and you are not allowed to take driftwood. Beware of protected natural areas, parks and private property. Public beaches and waterways are usually fair game. 

Once you find a great spot, you may be the one selling to others on line and making a handsome profit. Some pieces are so unique and beautiful that they can fetch a hefty price from a willing buyer. You may need to clean your driftwood before using or selling it.

Knowing where to find driftwood and having a great imagination will allow you to create your own beautiful and interesting pieces of art. Use your pieces for your home or to sell online, at a craft show or flea market.

If turning a flea market find into a beautiful piece of driftwood furniture is more what you’re looking to do – try applying Driftwood Weathering Wood Finish to bare, unfinished or sanded wood.

Gator on Driftwood
Be brave… sometimes you might have to fight for that perfect piece of driftwood. On the otherhand, it wasn’t that great of piece anyway…