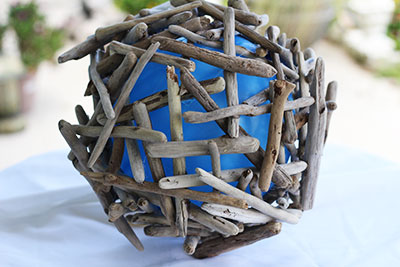
Creating Expandable Driftwood Candleholders and Plant Holders

This is an easy way to make driftwood candleholders and plant holders that will stretch to accommodate different size jars. Those pretty glass candle jars that you normally throw out after the candle burns down can now become a very pretty driftwood plant holder. The secret is simply using “stretch” bead and jewelry cord purchased from Michaels or from Amazon BEADNOVA 1mm Clear Elastic Stretch Jewelry Roll.
Materials You Will Need:
- 1mm Clear Stretch Beading or Jewelry Cording
- Glue Gun
- Glue Sticks
- Drill
- 1/8″ drill bit
- Glass container
- Driftwood Pieces preferably 1/2″ or more round, and straight. If you need driftwood pieces, we have driftwood in stock. 2-6″ pieces or 5-12″ pieces.
- Pencil to mark drill holes
- Ruler to measure and mark for drill holes


Place a driftwood piece against your glass container. Measure 2″ up from the bottom and mark a hole for drilling. Then measure up another 2-3″ from the first mark and drill a second hole. You want the holes to line up as much as possible on each piece of driftwood.


Once your pieces are all drilled, just start threading the stretch cord through the holes. I tied knots about every 4th piece to keep spacing a little more equal when the candleholder expanded but it’s not really necessary. Pull and tighten the driftwood row.

Make Your Circle
Occasionally place the driftwood row around the circumference of the glass shade to check the fit. When you have the row the length you want – tie a final knot or two. DO NOT CUT THE CORD. Form a circle with the driftwood row and continue threading the cord through 3 or 4 driftwood pieces from the other end. Knot the ends. You can add a little bit of hot glue to the end knots or lightly melt the stretch thread with a match.
If you want to make your own driftwood for this project, check out our tutorial on How to Create your Own Driftwood – it really works.
The simple holders are also great for Using driftwood in a Party or Wedding Theme.
We actually used this same technique to create pendant light shades and they look awesome! Making driftwood pendant light shades.


 Landscaping with driftwood can add visual interest and a focal point to areas that are frequently overlooked or otherwise seem to lack purpose and have no existing appeal. Imagine a large piece of driftwood where others might plant a tree or embed a large boulder – then surround your new sculpture with sea grass or wild flowers.
 chandelier for outdoor hanging in a special garden nook. Use it with candles or drape it with pretty flowers or vines.