Driftwood Bergere Chair Project

Driftwood Bergere Chair Refinishing Projectcat on Bergere chair

This is one of those projects I started over a year ago – yes over a year ago.  It took me that long to remove all the staples (if you’ve ever done a re-upholstery job then you know what I’m talking about); decide on a fabric; make my own piping and then summon up the courage to actually attempt the re-upholstering and applying piping.  And, in between there was a move to a new house so yes, this was a long time in the making.  Amazingly enough, this is one of those projects that came out so beautiful when it was finally finished that it was well worth the time it took and I now have a beautiful driftwood Bergere chair.

Driftwood Berege Chair

This is the chair I started with – picked up at a thrift store for a mere $25.  Pretty ugly but the style is exactly what I was looking for.  I knew I wanted a Bergere style chair to use the Driftwood Weathering Wood Finish to create a driftwood finish on the wood and recover it with some fresh new updated fabric most likely in gray tones.  When the time came to choose a fabric, it took forever to decide and I actually purchased three different fabrics.  I ultimately decided it was time to just pick one and move forward – anything was better than this hideous blue and pink fabric.

Driftwood Berege Chair

The first step is removing all the trillions of staples.  I used a pair of needle nose pliers.  You want to save all your pieces of fabric, including the lining pieces as you will use them as templates for cutting your own fabric so don’t get impatient and start tearing and ripping.  You’ll also want to take good closeup pictures of every angle of the chair to show how the fabric folds and the piping flows.  This really becomes helpful as does using the old fabric as a template to cut your new pieces.  Pay attention to the layers and sequence of batting, webbing, canvas and any other pieces that make up the underlying structure of your chair as you will want to duplicate it as much as possible and use the same pieces when possible.  Take pictures and make notes – you’ll be very glad you did.

 Driftwood Berege Chair

 Since I was going to use a paint stripping solution, I needed to tape off the areas I wanted to protect.

Driftwood Berege Chair

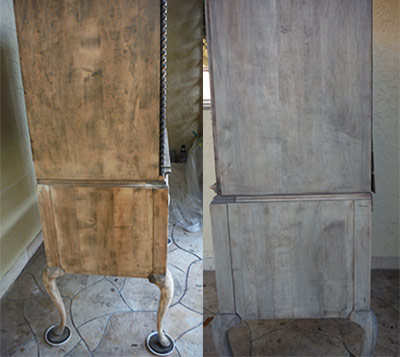
Then I started the very messy project of stripping this bad boy before applying the Driftwood Weathering Wood Finish that would give me the driftwood finish I was looking for.  Once the old paint was removed, I mixed a packet of the Driftwood Weathering Wood Finish powder with a cup of water and started applying with a brush.  Driftwood Weathered Wood FinishAnd of course, because I’m so impatient, I don’t test it first and I get a very dark color – darker than I really want. But I keep going anyway because it still looks good even though it’s darker than I want.  What I should have done was test it first and I would have known to dilute the solution.  This would have resulted in the lighter finish I really wanted.


Driftwood Berege Chair

Now starts the hard part of re-upholstering.  But this poor little chair sat like this for over a year before I picked up this project again.  Now, a smart person would have applied the Driftwood Liming Wax at this point certainly before recovering the chair with fabric but not me.  I was still okay with how dark the wood was so I began the re-upholstery.  Here’s where researching the internet came in very handy.  I researched many videos and websites on re-upholstering chairs and gleaned a lot of good information.  I am a fairly good seamstress so sewing the cushion didn’t scare me.  Cutting and making my own piping was just time consuming but ended up not being that bad at all.  Even applying the piping was pretty easy using Magna Tac glue. 

Driftwood Berege Chair
Following the advice of one website – I actually used a spray glue to fuse and apply the webbing and batting to the chair.  This eliminated the need for using too many staples in the areas where the wood was already worn out. Using the old fabric pieces as my templates, I cut all my new pieces in my nice new fabric.

Driftwood-Berege-Chair

Once I applied the batting to the front, back, arms and seat with the spray glue, I started stapling the fabric in place using an electric staple gun.  This is where I learned a very important lesson that helped me a lot and made a world of difference so I want to pass it on.  I initially started by pulling the fabric taught on all sides and stapling as shown on the left below – then I saw a video of someone who suggested folding the fabric under before stapling and I literally pulled out all my staples and started over with rolling under the hem before stapling.  You can see how much neater and cleaner it looks and I can tell you it will save you time as you will not have to go back and cut away the excess and you will not have hanging threads.  And it’s so much neater and easier to cover with either a single or double row of piping. 


Driftwood Berege Chair

Using Magna-tac glue I applied my single row piping.  Here is another big tip I’d like to share.  Measure and sew your pieces of piping together to create more than enough length to cover the area you are working on.  Trying to piece together two pieces of piping because you come up short just makes it very difficult and usually ends up looking sloppy.  Plus it usually ends up with trying to piece it together in an awkward place like smack in the front where it will be quite noticeable.  It’s so much easier if you have the right length to fully cover the area right from the start. Here you can see I’ve glued on the piping on the arm and tucked and glued the ends.  Start and end in the most inconspicuous area possible. Start with small sections first until you get comfortable with it though it’s not that hard. Just make sure to cover your staples.

  Driftwood Berege Chair

Weeks after the chair was completed, I decided to attempt applying the Driftwood Liming Wax to lighten the finish.  Not an easy task and not one I recommend.  Trying to avoid getting the wax on the fabric was difficult at best but with a lot of effort, I managed.  I do like the finish so much better.  You can see the difference below.  This is the driftwood shade I was looking for and if I had just taken the time to test the Driftwood Weathering Wood Finish I would have known to dilute it and would have gotten this color without having to add the Driftwood Liming Wax.  But I will say it again – this is one of my favorite projects and it came out so well.  I finally have my driftwood Bergere chair.  This chair would sell for an easy $600-$700 in the stores and it’s going to look amazing in my sunroom as soon as I can get that room finished.

Driftwood Berege Chair

Driftwood-Berege-Chair

Driftwood-Berege-Chair


Driftwood Aquascapes

I recently came upon a a beautiful piece of driftwood that a gentlemen was advertising for sale for use in an aquascape.  Now I had no real idea what he meant by an aquascape but the driftwood piece was very interesting and had me intrigued.  So much so, that I decided to do an internet search on the term “aquascape” to get a better understanding of an aquascape and how driftwood was being used in driftwood aquascapes.  It seemed obvious enough – a scene featuring water instead of land and using driftwood, but there seemed to be something more to it.  One look at the images I was finding and I was totally hooked and wanted to know even more.

whisper-of-the-pines
2013 Planted Aquarium Design Winner, Serkan Cetinkol of Istanbul Turkey with his Whisper of the Pines

Wikipedia describes Aquascaping as:

  “the craft of arranging aquatic plants, as well as rocks, stones, cavework, or driftwood, in

bonsai-driftwood2

an aesthetically pleasing manner within an aquarium—in effect, gardening under water. Aquascape designs include a number of distinct styles, including the garden-like Dutch style and the Japanese-inspired nature style.[1] Typically, an aquascape houses fish as well as plants, although it is possible to create an aquascape with plants only, or with rockwork or other hardscape and no plants.”

Here is a picture of the initial piece of driftwood that caught my interest.  Pretty cool right?

Apparently, there is a whole group of devoted and very talented Aquascapers who spend painstaking hours creating absolutely stunning aquascapes that are nothing short of “unworldly” in their presentation.  If you can imagine fish swimming through a forest or passing you by on a rolling grassy hill, then you have a pretty good idea of what some of the scenes can look like.  Some are very fairytale like while others capture and imitate their counterpart landmarks.  All are made using driftwood, sand and natural elements and take 6 months or more just to establish.

Morning-Forest
Planted Aquarium Design entitled “Morning Forest” by Pavel Bautin of Saint Petersburg, Russia – exquisite – an underwater forest.

And there are worldwide contests featuring the best aquascapes with quite a large following of aquascapers.  It seems to me that it would be a very calming hobby and that one would like to sit back and enjoy these beautiful aquascapes once they are fully established but, from what I’ve read, these professional aquascapers usually finish one and then dismantle it and on to the next one.

Aquascapers look to include stones, sand and driftwood to create the most natural looking aquascape and finding just the right piece or pieces of driftwood is crucial.  You want to make the scene look as natural as possible.  Consider varying sizes, height and width of your driftwood and the type of scene you are looking to create.  Manzanita and Malaysian oak are two good choices in driftwood for aquascapes. 

country-of-soul
“Country of Soul” aquascape by Tatiana Timirbulatova of Samara, Russia that just looks like more like a sunset at the beach – amazing.


Form the size you want by breaking the ends of branches – not sawing or using any tool.  Breaking will create a more natural look.  Soak your driftwood pieces for at least 2 weeks or more in plain water to remove the tannins which will otherwise discolor your aquascape.  Change out your water every few days until you no longer have any change of color after soaking for a few days.  Only then will your driftwood pieces be ready for your aquascape.

I can appreciate this creative hobby for it’s use of driftwood and it’s obvious skill level.  Personally, I would want to enjoy one of the established underwater gardens once I had it created.  It just seems like it would be so calming and mesmerizing.  To me, they are absolutely beautiful.


Lost-beach
“Lost Beach” by Mustafa Sezgen of Kocaeli, Turkey – can you believe this is an underwater landscape? Amazing. Notice the driftwood trees?


  If you would like to learn more about Aquascaping in general and driftwood aquascapes, here is a good link. AquaScaping World Magazine.


Driftwood Highboy Refinishing Project

Over the past 2 months, I’ve been slowly working on my driftwood highboy refinishing project which meant stripping and refinishing an antique highboy piece and then refinishing it with the Driftwood Weathering Wood Finish.  Well, I’m happy to say it’s finally done and I couldn’t be happier with the results.

driftwood highway
Finished Highboy using Driftwood Weathered Wood Finish

I purchased this highboy piece over 30 years ago at an antique store.  At the time I purchased the highboy, it was a hideous orange toned stained wood but it was a bargain at $375.00.  I distinctly remember that once I had stripped the orange stain, I had made a mental note that the bare wood had a beautiful distressed look to it and even back then I was tempted to leave it that way.  I also remember that I had done a major faux pas at the time I stripped it by using a steel wool pad to remove the finish and it had left little black specks everywhere.  But this had actually contributed to the weathered look in a good way.  I ended up staining the highboy in a dark mahogany color to match the other furniture in my room at the time.  I also remember that the stain did not take very well and I literally had to apply the stain and leave it on the piece without wiping off the excess.  This was the only way I could get the stain dark enough over the maple wood.

Original antique highboy
Original piece

Above is the piece before stripping and sanding.  It has always been a beautiful piece.  Below, I have started to strip and sand and needed to remove some of the more intricate pieces in order to get the finished removed.  I did this work outside in the Florida summer heat – not exactly the best conditions to be doing this type of work and that is why it took me 6 weeks to fully complete this project.  Some days it was just too hot!
Driftwood Highboy

Driftwood Finish Highboy


Driftwood Weathered Wood Finish applied to top drawer but still drying
Antique driftwood highboy
Stripped and sanded; application of Driftwood Weathered Wood Finish.

The original hardware was brass and my original intention was to create a “rusted” finish.  I thought driftwood finish would be a nice backdrop to rusted hardware.  I attempted many solutions to create a rusted finish including soaking the hardware overnight in baths of vinegar and baking soda; vinegar and salt; and ammonia.  While I didn’t get a rust finish, I did get a somewhat verdigris finish.  After soaking the hardware pieces overnight and letting them air dry, I then applied a product by Modern Options called Verdigris with a paintbrush and dried it using my heat gun.  This seemed to increase the verdigris finish somewhat although I did not use the product according to their directions.  I did not apply their base product.  I have since found that the hardware’s verdigris finish has continued to turn quite a bit.

distressed hardward
Distressing the hardware
finished driftwood highboy
Finished driftwood highboy

 Driftwood highboy

So there you have the final driftwood highboy refinishing project.  It came out even better than I had expected and I’m in love with this piece but now my bed no longer matches.  Just when I thought I was done with refinishing projects for awhile…

How to Make a Driftwood Windchime

How to make a driftwood windchime using driftwood pieces and inexpensive silverware,  sea glass and marbles.  Here’s two different easy driftwood windchime versions – both make delicate chime sounds in the wind and either take just a few hours to make.  You can get creative and use seashells or other items that might inspire you.

 Driftwood Windchime

Here’s what you will need:

  • driftwood pieces (4-5). If you need driftwood pieces, we have driftwood in stock. 2-6″ pieces or 5-12″ pieces.
  • silverware (4-6 pieces – use soft pieces for easy flattening)
  • 14# fishing line
  • 24# beading wire
  • ear hoops from the beading department
  • flat drain from Wal-mart
  • sea glass pieces (available at Wal-mart)
  • Aleene’s Jewel It glue to glue fishing line knots
  • drill and drill bit for silverware
  • regular and needle nose pliers to mold wire around sea glass and bend fork
  • scissors
  • saw for driftwood pieces
  • hammer to hammer all the silverware pieces until flattened

Driftwood windchime

driftwood windchime

1. First use a hammer to flatten all the silverware pieces.

2. Drill a small hole at the top of each piece in order to pass the fishing line through.

3.  On one fork piece, using the pliers, twist each prong in each direction and curl under the end to form a small loop as shown in the picture below.  You will use each loop to string fishing line from the fork to loops on the strainer.

driftwood windchimedriftwood windchime

driftwood windchime

4.  Add an ear hoop to the underside of the strainer and using the fishing line, attach your choice of silverware as the centerpiece to your windchime.  I like to use a large silver spoon only because it tends to “hit” more of the other pieces moreso than a narrow knife or fork.

driftwood windchime

5.  Add 4 more ear loops to each opposing sides of the strainer.  These will be for the driftwood pieces.

6.  Add 4 more ear loops in between the existing ones.  These will be for the sea glass pieces.

7.  Now add 4 more ear loops in a circle half way between the outside rim and the center. These will be for the additional silverware pieces.  Add as many loops as you have silverware pieces.  You should now have 12 loops in additional to the center loop.

driftwood windchime

8.  Now cut your driftwood pieces to the lengths that you want.

9.  Drill holes in one end of each piece.  Insert a length of fishing line and tie off.  Just estimate a length of fishing line as you don’t want to put it together quite yet.

driftwood windchime

driftwood windchime

10.  Using the images above, wrap the wire around the sea glass pieces to hold it in place and form and loops and shapes shown.  These will hang easily onto the ear hoops.  You just want to make sure the sea glass is wrapped securely.  You can make it as long and elaborate as you wish – wrap two or more if you want.

11.  Now you want to put it all together.  It’s easiest if you can put a fishing line loop from the fork handle and hang it from something before you start to hang and knot each piece.  Start with each fork prong loop and attach fishing line (about 8 inches) from the loop on the fork  to a loop on the strainer and repeat for each fork prong loop – making sure it hangs level.

12.  Then decide how long you want each piece of silverware to hang and attached each piece.

13.  Now attach each piece of driftwood.

Driftwood Windchime

14.  Attach the seaglass pieces.

15.  Finally, go back and apply glue to each knot to make sure they do not come apart.

2ND DRIFTWOOD WINDCHIME VERSION

Below is another version using a different strainer, clear marbles (also from Wal-Mart), a dime store windchime I took apart, and driftwood pieces I made myself following this method How to Make Your Own Driftwood.  I actually like this second version better.  I ended up using a small baby spoon in the center and glued several of the marbles on the top of the strainer.  The strainer was larger.  I also used a stronger beading wire.  There’s so many options you can use to make your own version.

driftwood windchime

driftwood windchime

Dimestore windchime I took apart and used the chimes

driftwood windchime

I found two different versions of this strainer – the wooden one obviously cheaper and easier to take apart.  This worked great.  Just follow the same instructions for version one but use this second, larger strainer as your base and take apart the dime store windchime to use those chimes in place of the silverware.  I did however use one silverware fork for the top piece and another spoon for the very center of the chime.   And finally, I used marbles in place of sea glass and attached 5 marbles as a decorative element on the top of the strainer which I thought added a nice touch.


Creating a Driftwood Finish With Paint

Creating a Driftwood Finish With Paint

Driftwood Finish with Paint

I used this technique for creating a driftwood finish with paint, which I confess I garnered from another website some time ago and unfortunately, I do not remember where.  But, I do remember the process and it worked quite well for me in getting that driftwood look.

I started with just two different driftwood-like colors of flat, water-based latex paint, plus a small amount of  basic black and white artist’s acrylic.  The black and white were just from small tubes of acrylic paint I had on hand for painting on canvas.  You will only need a small amount of the white and black so just buy small tubes if you don’t already have some water based latex or acrylics on hand.

Sherman-Williams Grays Harbor

Sherman-Williams Pavestone

Pick the two colors you want from any assorted flat, water-based acrylic grays, beiges, sand or dark creams at the paint store that you feel will give you the colors and shades to mimic a driftwood finish.   I chose a quart each of 6236 Grays Harbor and 7642 Pavestone latex flat paint & primer both from Sherwin-Williams’ SuperPaint collection.  So now you have Grays Harbor and Pavestone.

But you want to have more colors to work with and in order to achieved additional tints and shades I merely added a little of the white or black to Grays Harbor and Pavestone.  Pour a small amount of Grays Harbor into a plastic cup or container and mix in a small amount of white paint to achieve a lighter tint – we now have Grays Harbor Light.  Do this again using Pavestone as your base and you will create Pavestone Light.

Now pour some of Grays Harbor and Pavestone in yet two more separate containers and add a small amount of black to each to get a darker shade of Grays Harbor and Pavestone.  You now have Grays Harbor Dark and Pavestone Dark and a total of 6 different driftwood colors for creating a driftwood finish.  Truthfully, I believe I only used 4 of the colors on my project but you now have lots of different shades and tints to work with and you can create as many as you want using this method of adding varying amounts of white or black to your base driftwood colors.

cat in bookcaseThis dresser was originally black with a beautiful antique gold stencil pattern but, while it was once one of my favorite pieces, it no longer suited my new driftwood color scheme and beachy style.  I went from British West Indies with its dark woods, burnt orange painted walls and vibrant tropical colors  to subdued sand-toned walls and creamy beach theme with driftwood furniture and accessories.  In the interim, before I decided on trying a driftwood finish using paint, I had given the dresser a distressed white finish.  It was nice but  I knew I could do better.  I wanted that highly sought after driftwood finish and I also really liked a lot of the mirrored furniture I was seeing.  Why not combine a driftwood finish with mirrored drawer fronts?

After mixing my paint colors, the procedure went as follows:

1.            First, I used the Grays Harbor and painted the whole piece.  Since I had never put any type of finishing product on the piece after I had painted it white,  all I needed to do was scruff it up a bit with sandpaper to get some good paint adhesion and paint over the white with the gray.

2.            Next, I took the darkest gray shade Grays Harbor Dark and made it a glaze by adding equal part water.  I used a soft cloth and went over the areas of the legs where you can see the carving so that the darker shade got into the grooves.  Don’t let the paint sit – you have to move quickly and wipe off most of the paint that has not settled into the grooves.

3.            I then made a glaze from the Pavestone base color.  Again, ½ water and ½ paint to make the glaze.  I applied this layer in small areas of the piece with a brush and worked quickly to blend and soften the paint using a soft cloth – taking off quite a bit of the glaze as I went along.  I slowly did this to the whole piece.

4.            The next layer was the Pavestone Light.  Again, I made a glaze of ½ paint and ½ water.  I applied this layer using a very dry brush technique and very long brush strokes with a very light hand.  I didn’t apply a lot – just a little here and there until I was happy with it.

5.            For the final touch, I diluted black paint and a little water and, with a toothbrush and my fingers, I flecked the surfaces of the dresser with just little black specks here and there.

6.            When I was done, I used Driftwood Natural Beeswax Wood Butter to give it a nice soft protective finish.

After several attempts at finding just the right knobs, I finally chose mercury glass knobs from Anthropologie.

I couldn’t be happier with how the finish came out and how the final piece looks.  But I will note two things.  First, as nice as this painted driftwood finish looks – I could have used the Driftwood Weathering Wood Finish and got just as nice if not nicer driftwood finish in a lot less time and without all the paint and cleanup, but, I hadn’t developed the product yet and, in fact, this project inspired me to find an easier alternative; and  second,  having the mirror put on the dresser fronts may not have been the best idea.  While it looks great (I had them done by a local glass and mirror shop), the mirror is very heavy and prone to crack if you put the handles on too tight or if you move the piece a lot like I have.  The mirror on two corners has already chipped and cracked.  I had really, really wanted antiqued mirror, i.e. smoky, aged and distressed but I could not find any locally so that was disappointing.  This piece would have been over the top if I had been able to use antique mirrors as I originally wanted… sigh.

Creating a Driftwood Finish with Paint

Creating a Driftwood Finish with Paint

Step by Step Directions for Making a Driftwood Lamp

Step by Step Directions for Making a Driftwood LampDriftwood Lamp Instructions Step 1

A driftwood lamp is one of the simplest things you can make with driftwood – don’t be intimidated.  You would really have to work at it to make a driftwood lamp that DOES NOT look good.  It’s a matter of placing and attaching the driftwood pieces in a position that you find pleasing to the eye.   But, first things first – find yourself a lamp base that you want to use or buy a kit with all the necessary pieces.

1.  Gather your Driftwood.  If you don’t have a local source, we have driftwood available in varying sizes.  There are also other sellers on Etsy with varying prices.

2.  Find your Lamp.  For the lamp I’m working with here, I found the lamp at a thrift store for $8.00 and tested it before leaving the store to make sure it still worked.  This particular lamp was an easy one to work with as it was just a metal rod sitting on a metal base.  What I particularly liked was that it had a pull chain on/off switch.  Find a lamp that is the right height for the pieces of driftwood that you will be working with and one that you can easily take apart down to the rod.  Some lamps will not have a rod but that’s okay – a creative mind will be able to use driftwood pieces to create a base.  In that instance, you could use long thin driftwood pieces like we are using here or you could use unique and bulkier pieces to create your base and you won’t have to try to hide the rod.  Just make sure your driftwood lamp base is stable.

3.  Supplies. 

Glue – I used Aleene’s 7800 Adhesive which I purchased at a big chain hardware store.  Choose a glue that will adhere to both wood and whatever your base is made of, in my instance it was metal.  The glue needs to dry clear and it’s really helpful if it bonds quickly.

Masking Tape – any painter’s or masking tape will do – you just want to secure the driftwood pieces in place while the glue dries.

4.  Start Gluing.  Get an idea of what driftwood pieces you may want to use and how you want to place them around your base.  Start gluing one by one.  


5.  Wrap with Masking Tape.  When you’re finished gluing, carefully wrap with masking tape to hold you pieces until the glue dries.  Overnight is good.  In my case, I glued one round of pieces and let dry overnight.  The next day, I decided to add more pieces.


6.  Final Touches.

If you didn’t like the metal base or just wanted to add a little something more, here are a few ideas to personalize your driftwood lamp, but remember “less Driftwood Lamp instructionsis more”.  Simple driftwood lamps are quite beautiful with just the driftwood.

Sand – Use a white glue such as Elmer’s and brush it all over the base.  Pour fine white sand onto the glue until the base is completely covered.  You can build up the sand by layering, letting dry and then coat again with glue and sand until you’ve build up several layers.

Sea Glass – Glue sea glass pieces onto the base with a clear drying glue.

Shells – Dig out that shell collection you’ve had for years and start adhering shells with clear drying glue.  Keep it simple and don’t go overboard.

Moss – Find a moss that you like and glue the moss in between the driftwood pieces all around the base.  This adds more of a “woodland” look rather than seashore but still has a nice natural look to it.

Now that your lamp is finished, you need to find a lamp shade.  I’m on the hunt for the perfect white shade for my new lamp as I think it will look better than this patterned lamp shade.Driftwood Lamp instructions

For more driftwood lamp styles check out create a driftwood lamp and simple candleholders using driftwood. It only takes a little imagination to put some eclectic lighting into your living space. You’ll save hundreds of dollars on what it would cost for a similar driftwood lamp and you’ll have the satisfaction of knowing that you can create a driftwood lamp yourself.

Where to get driftwood

Where to Get Driftwood

Use driftwood to create all sorts of beautiful items, such as mirror or picture frames, lamps, rustic-looking clothes hangers, candleholders, or even excellent centerpieces for weddings and focal pieces for landscaping.  The list is endless if you use your imagination. But most of us don’t live right on beach so where do you find driftwood. If you’re interested in collecting driftwood as a hobby, or as a way to make some extra cash from time to time, then read on, and learn how and where to get driftwood treasures.

It’s actually pretty easy to make your own driftwood at home and we’ve created an easy tutorial.

Where to fine driftwoodBuying Driftwood

One of the advantages of buying driftwood in person, is that you can look at the pieces and choose the ones that best suit your project. Driftwood pieces of all shapes and sizes are available from craft and hobby shops, florists, souvenir shops, aquarium shops and at flea markets. You can also buy driftwood on eBay, and at many other online stores.

The downside about buying pieces of driftwood online is that they can sometimes be rather pricey, especially when you consider shipping. Pieces can be big and heavy, and shipping costs can add a significant amount to the actual price of the item. Prices vary a lot but you need to keep in mind the shipping costs. 

Our Driftwood Storewww.LittleDriftwoodStore.com for driftwood pieces from 2" - 12"

DIYDriftwood now sells driftwood pieces good for making projects such as candleholders, birdhouses, mirrors, and other items where you might need pieces ranging in size from 2″ to 12″.  Visit our shop for driftwood pieces.  Shipping is free.

Etsy.com is also a good source for different size pieces of driftwood at reasonable prices.  If you live in Australia and need a source for driftwood you can try ElaLakeDesign an Etsy seller in Australia.

Where to Find Driftwood That Won’t Cost You a Cent

Finding your own driftwood won’t cost you anything and is a great way to spend a few healthy hours in the outdoors – either on your own, or with your family or friends. This is because most driftwood is found along riverbanks, at the edges of lakes, or along the beach. It’s a misconception that driftwood is only found on a beach. Riverbanks and around lakes are all good places to get driftwood.  I’ve even found beautiful pieces in swamps – I believe this is referred to as “bogwood”. Once cleaned and dried, I actually had some very unique driftwood or “bogwood” pieces. Some were even petrified wood.

The best time to find driftwood on the beach is early in the morning, late afternoon, after a storm, or when it is low tide. All sorts of debris washes up onto the beach, including rusty nails and jellyfish. It’s a good idea to protect your feet with a pair of beach shoes.

You may also have to do a bit of digging through the debris and sand to get to a piece of driftwood that catches your eye. If you don’t like getting your hands dirty, bring along a pair of gloves as well. Having a bag is a good idea, because those prized pieces of driftwood become rather awkward to haul around as you stroll along the shore. I see a lot of beautiful driftwood pieces here in Florida when I kayak in the coastal areas. Unfortunately, my kayak cannot hold the larger pieces I’d love to bring home. These are the times I wish my kayak was a canoe or skiff.

Protected Areas

Be aware that some areas are protected and you are not allowed to take driftwood. Beware of protected natural areas, parks and private property. Public beaches and waterways are usually fair game. 

Once you find a great spot, you may be the one selling to others on line and making a handsome profit. Some pieces are so unique and beautiful that they can fetch a hefty price from a willing buyer. You may need to clean your driftwood before using or selling it.

Knowing where to find driftwood and having a great imagination will allow you to create your own beautiful and interesting pieces of art. Use your pieces for your home or to sell online, at a craft show or flea market.

If turning a flea market find into a beautiful piece of driftwood furniture is more what you’re looking to do – try applying Driftwood Weathering Wood Finish to bare, unfinished or sanded wood.

Gator on Driftwood
Be brave… sometimes you might have to fight for that perfect piece of driftwood. On the otherhand, it wasn’t that great of piece anyway…

How to Refinish Driftwood

To me, the beauty of driftwood comes from having its surfaced worn away, bleached and sculpted by the elements.  Real driftwood would never have an intact shiny finish.  I definitely prefer a non-shiny finish in the pieces I create from actual driftwood found along the shore or even furniture pieces I have stripped down, sanded and re-created with a driftwood finish.  Nonetheless, there are times when you may want or perhaps need a protective finish like when you have a tabletop that will get lots of use and will be subjected to water marks if not protected.

I’ve contacted many woodworkers and companies that specifically make finishes in an ongoing quest to find a good product that would ultimately protect the finish while not darkening the color.

A lot of people will use polyurethane on their driftwood furniture or even driftwood sculptures.  This is one of the worst looks in my opinion.  The polyurethane tends to be heavy and makes it look artificial and plastic-like.  So what does one do?

I have found that lighter woods such as pine or birch handle some protective coatings better than others.  And by better, I mean the color you get once you apply the protective finish does not get as dark as other woods, but still gets darker.  I tried a product called High Performance Top Coat by General Finishes in a satin finish and I applied it over the Driftwood Weathered Wood Finish used on a piece of pine, birch and walnut.  I was happy with the outcome on the pine as it was only 1-2 shades darker, but the walnut was 10x darker and even the birch became too dark for my liking. So, I would recommend this finish if your driftwood piece is pine.

I also tried another product called Safecoat® AcriGlaze Matte by American Formulating and Manufacturing (AFM), a company dedicated to safe green products.  I ordered a sample bottle and tried the product on different sample boards of pine, birch and oak over the Driftwood Weathered Wood Finish.  I was very happy with the results considering everything else I have tried produced a very dark finish.  With the AcriGlaze Matte, I could see where I had applied the product but it really didn’t darken it by much and left no shine.  On some samples, I could not even tell I had applied any finish at all.  I am impressed with this product and would recommend it for use on bare driftwood or over a driftwood finish.  The above link will take you directly to Amazon where it can be purchased in quarts or gallons but make sure to get the matte finish.

Here is a description taken from their PDF:

DESCRIPTION: Safecoat® AcriGlaze is a special mixing medium and finish suitable for use in the display, art and show fields. It is mildew resistant, odorless and dries clear. Ideal for restoring old finishes to their original brilliance, sealing and preserving painted work, faux finishing and as an adhesive for paper mache. Dries clear. Available in gloss and matte sheens. USE ON: Clear finish for masonry, brick, plaster, wood, paneling, etc., where a soft low luster finish and sealer is desired. May be used both interior or exterior as a reducer for any type of waterbased paint. Excellent medium for artist colors and universal tints.

After trying many products, we came to realize that the best way to preserve the color of the Driftwood Final Finish Liquid Waxfinish was to use a product that does not contain solvents or oils.  They can be hard to find which is why we also decided to release our Driftwood Final Finish Liquid Wax.  It contains no solvents or VOCs but does contain carnauba wax for a very hard and durable finish, plus it’s in liquid form so it’s easy to apply and the finish is a soft satin finish.  It usually takes about two coats and that depends upon how thirsty your wood is.  Driftwood Final Finish Liquid Wax 

If you still want to finish driftwood so that it is protected and preserved for years to come, and don’t mind the “shiny” look –  read on.

refinishing driftwood

Step 1: Smoothing the Surface of the Driftwood

You will need to begin by smoothing the surface of the wood using something like a 220 grit sandpaper to take off any rough spots. Nature will already have done most of the hard work for you, but there are usually a few spots that need a little bit of extra work. If the particular piece of driftwood you are working with has any sharp or broken ends, then these too need to be sanded away, to create a rounded and smooth surface.

Step 2:  Pre-Treating the Driftwood

Next, you will need to treat the wood before it can be stained – if indeed you are going to stain the piece. For this you can use a wood conditioner, but do not apply it directly to the wood. Instead, soak a cloth in wood conditioner and then rub it into the surface of the driftwood. Once the wood has been generously coated, leave it to dry for 15 or 20 minutes. Some people are tempted to skip this stage and move straight on to staining their piece. Do not be tempted to do this. Applying a wood conditioner is essential to ensure that, when the stain is added, it will create an even finish.

Step 3: Applying the Stain

Time to apply a stain to your wood. You will want to put on rubber gloves for this step, so that you don’t end up with stained hands and, as with the wood conditioner, put the stain onto a cloth first, and then rub in into the wood. Apply any stain with a circular motion and rub it well into the wood. Once applied, leave the stain to soak in for between 5 and 15 minutes, depending on how deeply stained you want the wood to be.

Once you have the color you are looking for, rub any excess stain off using a dry rag, and set the wood to one side for several hours, until the wood is dry when you touch it and no stain comes off when you run your fingers along the surface.

Step 4: Applying Polyurethane

The final stage is to apply two thin coats of polyurethane to the whole surface of the driftwood piece, allowing 6 to 8 hours for the first coat to become dry before applying the second coat.  Keep in mind that applying polyurethane or even beeswax polish will darken your finish considerably.  I would test an area first if possible to make sure you like how dark it will become.

Your driftwood will now last for years and provide you with a wonderful and uniquely sculptured ornament to enjoy.

How to Create a Driftwood Lamp

How to Create a Driftwood Lamp

Making a driftwood lamp is a great way to put your favorite driftwood pieces on display. Whether using one large solid driftwood piece or several small pieces, your new driftwood creation is going to bring plenty of texture and certainly a wonderful naturalness to your decor by bringing the outdoors feeling in. These three simple lamp-building projects can be completed in one afternoon.

Turning a Flea Market Find into a Beautiful New Driftwood Table Lamp create a driftwood lamp

Pick up a basic table lamp from a yard sale or thrift shop, if you don’t already have one that you’d like to redo.

  1. Disassemble the lamp to remove any decorative column so you are left with the metal center rod.
  2. Reassemble the lamp with just the center rod. This is what you will attach your driftwood pieces to.
  3. Gather several slender driftwood pieces that curve slightly outward at one end. The bottom ends will sit on the the original base; the tops will reach just beyond the socket.
  4. Surrounding the lamp rod with the driftwood and attach with a multi-purpose epoxy glue, position the top ends outward and away from the socket.
  5. Top with your favorite lampshade.

When turned on, this light will present a soft driftwood silhouette.

Create a Driftwood Lamp For Your Desk

Create a driftwood lampGet started with an inexpensive lamp kit, a quarter-inch thick wooden base, four wooden buttons and four or more pieces of driftwood of similar length to the base.

  1. Start with a base that’s about nine inches long and three inches wide.
  2. Drill a three-quarter inch hole into the center.
  3. Drill the same width hole through the center of each piece of driftwood. The driftwood shapes can range from flat to round and, for this project, the width or diameter of each piece should not exceed two inches.
  4. Fix the lamp rod to the base by securing it with a washer and nut.
  5. Artfully stack the driftwood horizontally over the rod and onto the base. Once you have happy with the placement of the driftwood pieces, use glue to adhere each piece together so they stay in place.
  6. Work the lamp cord through the bottom of the base, through each piece of driftwood right up to the top of the rod.
  7. Follow the lamp kit’s instructions to wire and secure the socket to the rod’s top end then attach the harp to the socket.
  8. Glue the wooden buttons to the bottom four corners of the base to give enough height to accommodate the lamp cord under the base

Ttop off your new lamp with a complimentary shade.

Driftwood Stands Out As A Floor Lampcreate a driftwood lamp

Bring the outside in and create a driftwood lamp for that special reading nook.

  1. Drill a three-quarter inch center hole into a 1″ thick base that can be 12″ wide by 12-24″ long.
  2. Drill a quarter-inch hole through the side of the base until it merges with the center hole. This will be for the lamp cord.
  3. Run the lamp cord through the hole in the side of the base to the center hole and then work it through a five-foot lamp rod.
  4. Choose as many long pieces of driftwood that you want to use to achieve your look – 25-30 pieces all roughly the same height. Cut the ends of each piece so you have a flat surface.
  5. Decide as best you can where you want to place each piece and drill a wide enough hole into the base about 1/2″ deep to accommodate each piece.
  6. Using a fast acting epoxy glue, glue each piece into their respective drilled holes until you achieve the look you want. Make sure the glue doesn’t seep out onto the top of the base although if it does, you could easily disguise it with pieces of moss.
  7. The brass rod should extend at least four inches above the top of the driftwood.
  8. Finish as per the instructions for the desk lamp.
  9. Top it off with a complimentary shade and you’ve created a beautiful new driftwood floor lamp.

Driftwood lampNeed pictures to go with the step by step directions?  Check out Step by Step Directions for Making a Driftwood Lamp. There are countless other ways to create a driftwood lamp, chandeliers, floor lamps, wall sconces and simple candleholders using driftwood. It only takes a little imagination to put some eclectic lighting into your living space. You’ll save hundreds of dollars on what it would cost for a similar driftwood lamp and you’ll have the satisfaction of knowing that you can create a driftwood lamp yourself.

For more driftwood projects, check out 5 Easy Creative Driftwood Projects you Can do at Home.

Driftwood Mid-Century Modern Nightstand Project

Project – Using Driftwood Weathering Wood Finish on Mid-Century Modern Nightstand

Driftwood Mid-century modern dresser

I found this beautiful nightstand at Goodwill for $25.00. I knew right away that it was a good, quality piece of furniture and sure enough, a little online research and “Dixie” furniture company was well known for mid-century furniture pieces. So, my problem is I want a mid-centuryDriftwood projects modern piece with the look of driftwood.  I’ve recently become infatuated with mid-century accessories and furniture – especially atomic art represented by the starburst.

This is my experiment to see if I can successfully combine the two with an updated, driftwood mid-century modern piece.

One of the things I found so special about this little nightstand was the handles – they had little “starburst” like symbols engraved in the metal. I had never seen that before but I thought that was pretty cool.

So my thought in this project is to use a starburst pattern and apply it using a mixture of wood glue and water like you would a stencil. Here is how the project went:

Driftwood Mid-Century dresser

Original piece being investigated by my little helper.

handles

These are the handles with the little “starbursts”

stripping the stain

Stripping the stain

Sanding the finish

Sanding the finish and then removing all the dust with tack cloth.

Sanded

All stripped and sanded and ready for the next step – adding the graphic.


Adding the stencil

Adding the graphics.  I used carbon paper and traced the image onto the nightstand.  Then carved around the image with an exacto blade.  The idea behind this was that the Driftwood Weathering Wood Finish would get in the cuts and create a darker outline of the image.

applying the graphic

Once I had the image on the nightstand with the carbon paper – I then used a mixture of Elmer’s glue and water (half n’ half) and went over the graphic using an artist’s brush.  The glue mixture should prevent the stain from adhering and it will give me the graphic on the nightstand.  There are wood glues out there that are specifically made to stain and others that should not take stain.  Another idea might be to use an artist masking fluid.  I suspect that would work just fine and it would give you a lighter graphic.  You should be able to remove the masking fluid and reveal the unfinished wood coming through your pattern.  I wish I had tried masking fluid first but patience is not one of my virtues and I wanted to get started with what I had.  I’ll try it with the next project.

Applying the Driftwood Weathered Wood Finish

I’ve applied the Driftwood Weathering Wood Finish.  One thing I noticed once I stripped the piece was that there were different types of wood used to make this piece.  The legs were a blond oak and the sides I believe were a maple but I’m not 100% positive about that.  The top piece is veneered – so I knew once I applied the Driftwood Finish, the different types of wood would each take the color differently.

Driftwood Weathered Wood Finish on Mid-Century Modern dresser

As you can see, the final piece has a lot of different tones – the legs are much lighter.  But I love how the graphic came out.  Now I have the problem of putting a protective finish on it.  My first thought was to put a coat or two of the Driftwood Beeswax Wood Butter but I quickly nixed that idea.  I realized that putting the wax over the cuts in the pattern would leave bits of wax in the cuts – like you get when someone does a poor job of waxing your car.  Thankfully, I realized this before I went ahead with putting on the beeswax.  But it does need some type of protective finish.

I’ve decided to put a matte polyurethane coating on the top at least.  I’ve applied the polyurethane to the top and sides and it really darkens the finish quite a bit – more than I think I want.  So I’m hesitating about putting the polyurethane on the front over the graphic – I’m afraid I’ll lose the graphic.  I may decide to use the Driftwood Liming Wax on the whole piece.  I suspect that I will lose the graphic if I do but I may be brave and do it anyway.  I will post pics if I do.

I think I have at least achieved my driftwood mid-century modern look that I was going after.

Follow-up – I decided to sand the polyurethane off and apply the beeswax wood butter instead to the sides and top.  The beeswax wood butter actually made the sides and top just as dark as the polyurethane so my only alternative is to leave it as is with a darker top and sides than I want or move on to trying the liming wax.  I decided to go with the liming wax and I’m happy with that.  It lightened up the top and sides a bit.  In the picture below, I have not applied to the Driftwood Liming Wax to the top yet – just to the side.

Liming wax applied to side


Wood Desk Refinishing Project

A PERSONAL INTRODUCTION: Hi! Mike here, from TimelessPaper.com. My wife, Emily, and I run a paper and design company (and blog), and were recently fortunate enough to run across DIYDriftwood’s products. I am by no means an expert on anything related to woodwork, but what follows is an account of my experience. Perhaps it will be of assistance to someone out there interested in desk refinishing with Driftwood Weathering Wood Finish.

Refinished Desk with Driftwood Weathered Wood Stain

PROJECT INTRODUCTION: Refinishing furniture has always been one of the tasks that have scared the pants off me. In fact, forget RE-finishing, any finishing makes me nervous. There are highly skilled artisans out there who know how to enhance the natural beauty of wood. I am not one of those artisans.

However, the time recently came for Emily’s desk to be spruced up. She oh-so-frugally found this desk for $10 at a yard sale a few years ago. The first solution was to cover it in gray latex paint. That began to chip and scratch pretty quickly under heavy use, and ended up looking like the picture below.

driftwood_stain_desk_timeless_paper2

THE CHEMICALS: After some advice from the experts at our local home improvement store (I can’t even remember if it was Lowes or Home Depot), we were directed to a liquid paint remover called Jasco’s Paint & Epoxy Remover. It claims that a single application can remove several layers of paint at once in just fifteen minutes. Turns out – that’s the truth.

driftwood_stain_desk_timeless_paper4

SAFETY: While wearing protective latex gloves and wielding a disposable foam paint brush, I slowly poured a glop of the Jasco on the desk. After 15 minutes, a stiff putty knife can remove the paint with absolutely no effort. In hind sight, I’m not sure it was wise to wear LATEX gloves to protect me from a product that chemically eats away at LATEX paint. However, I luckily escaped unscathed.

driftwood_stain_desk_timeless_paper3

TIPS FOR NEXT TIME: The Jasco should be applied liberally. In the spots where it was spread too thinly, the paint did not come off with the putty knife. My trusty Black and Decker Sander, however, got off the remaining paint chips with ease. I also made the mistake of working in direct afternoon sun for awhile. The Jasco wound up evaporating before it could do its job. Work in a well ventilated shady spot, if possible.

driftwood_stain_desk_timeless_paper5

FINAL PREP FOR THE DESK REFINISHING: After the paint was stripped there was still an orange hued stain on the surface. I’m not sure if this was actual stain, or just a patina of age. Either way, a quick 60 grit sanding of the entire piece revealed the natural yellow wood. At this point, sawdust buried the desk and filled the air. Make sure to wipe the piece clean with a damp rag before continuing.

THE NEW FINISH: The fine folks over at DIYDriftwood.com have concocted a powder-based finish that gives wood a gorgeous weathered look. Imagine taking all of the yellow/orange hue out of wood and replacing them with a calming gray.

The powder is mixed with a cup of water to produce a liquid that can be applied with a foam brush. At first it looks like the wood is just getting wet, but as the minutes pass, the wood dries and a gray tone remains. After only a few minutes the result was great. Giving it several more hours in the sun made the desk even grayer.

driftwood_stain_desk_timeless_paper7

The picture below shows where we covered the entire top with one coat of the Driftwood Weathering Wood Finish product. You can see the top section starting to dry and gray. The middle section is still wet, and the bottom left corner is untreated.

driftwood_stain_desk_timeless_paper9

Below, the driftwood colorant has dried and continues to turn more gray as time passes.

driftwood_stain_desk_timeless_paper10

The color has grayed even more since Emily took these photos. It’s more gray in person than these photos show.

driftwood_stain_desk_timeless_paper11

driftwood_stain_desk_timeless_paper12

Emily used these inlay checker knobs from Anthropologie that she already had on hand, and lined the drawers with a bamboo print paper.

driftwood_stain_desk_timeless_paper15

driftwood_stain_desk_timeless_paper16

EMILY’S REACTION: I’m happy to have my desk back! An old table from Ikea just hasn’t been the same. I highly recommend the natural, muted, gray tones of this driftwood finish!